By: CS2103T W12-3 Team Since: Sept 2018 Licence: MIT
1. Setting up
1.1. Prerequisites
-
JDK
9or laterJDK 10on Windows will fail to run tests in headless mode due to a JavaFX bug. Windows developers are highly recommended to use JDK9. -
IntelliJ IDE
IntelliJ by default has Gradle and JavaFx plugins installed.
Do not disable them. If you have disabled them, go toFile>Settings>Pluginsto re-enable them.
1.2. Setting up the project in your computer
-
Fork this repo, and clone the fork to your computer
-
Open IntelliJ (if you are not in the welcome screen, click
File>Close Projectto close the existing project dialog first) -
Set up the correct JDK version for Gradle
-
Click
Configure>Project Defaults>Project Structure -
Click
New…and find the directory of the JDK
-
-
Click
Import Project -
Locate the
build.gradlefile and select it. ClickOK -
Click
Open as Project -
Click
OKto accept the default settings -
Open a console and run the command
gradlew processResources(Mac/Linux:./gradlew processResources). It should finish with theBUILD SUCCESSFULmessage.
This will generate all resources required by the application and tests.
1.3. Verifying the setup
-
Run the
seedu.address.MainAppand try a few commands from the user interface command box -
Run the tests to ensure they all pass.
1.4. Configurations to do before writing code
1.4.1. Configuring the coding style
This project follows oss-generic coding standards. IntelliJ’s default style is mostly compliant with our coding standards but it uses a different import order from ours. To rectify,
-
Go to
File>Settings…(Windows/Linux), orIntelliJ IDEA>Preferences…(macOS) -
Select
Editor>Code Style>Java -
Click on the
Importstab to set the order-
For
Class count to use import with '*'andNames count to use static import with '*': Set to999to prevent IntelliJ from contracting the import statements -
For
Import Layout: The order isimport static all other imports,import java.*,import javax.*,import org.*,import com.*,import all other imports. Add a<blank line>between eachimport
-
Optionally, you can follow the UsingCheckstyle.adoc document to configure Intellij to check style-compliance as you write code.
1.4.2. Updating documentation to match your fork
After forking the repo, the documentation will still have the CS2103T W12-3 Team branding and refer to the CS2103-AY1819S1-W12-3/main repo.
If you plan to develop this fork as a separate product (i.e. instead of contributing to CS2103-AY1819S1-W12-3/main), you should do the following:
-
Configure the site-wide documentation settings in
build.gradle, such as thesite-name, to suit your own project. -
Replace the URL in the attribute
repoURLinDeveloperGuide.adocandUserGuide.adocwith the URL of your fork.
1.4.3. Setting up CI
Set up Travis to perform Continuous Integration (CI) for your fork. See UsingTravis.adoc to learn how to set it up.
After setting up Travis, you can optionally set up coverage reporting for your team fork (see UsingCoveralls.adoc).
| Coverage reporting could be useful for a team repository that hosts the final version but it is not that useful for your personal fork. |
Optionally, you can set up AppVeyor as a second CI (see UsingAppVeyor.adoc).
| Having both Travis and AppVeyor ensures your App works on both Unix-based platforms and Windows-based platforms (Travis is Unix-based and AppVeyor is Windows-based) |
1.4.4. Getting started with coding
When you are ready to start coding,
-
Get some sense of the overall design by reading Section 2.1, “Architecture”.
-
Take a look at Section 3, “Implementation” for a more detailed description of the implementation of our features.
2. Design
2.1. Architecture
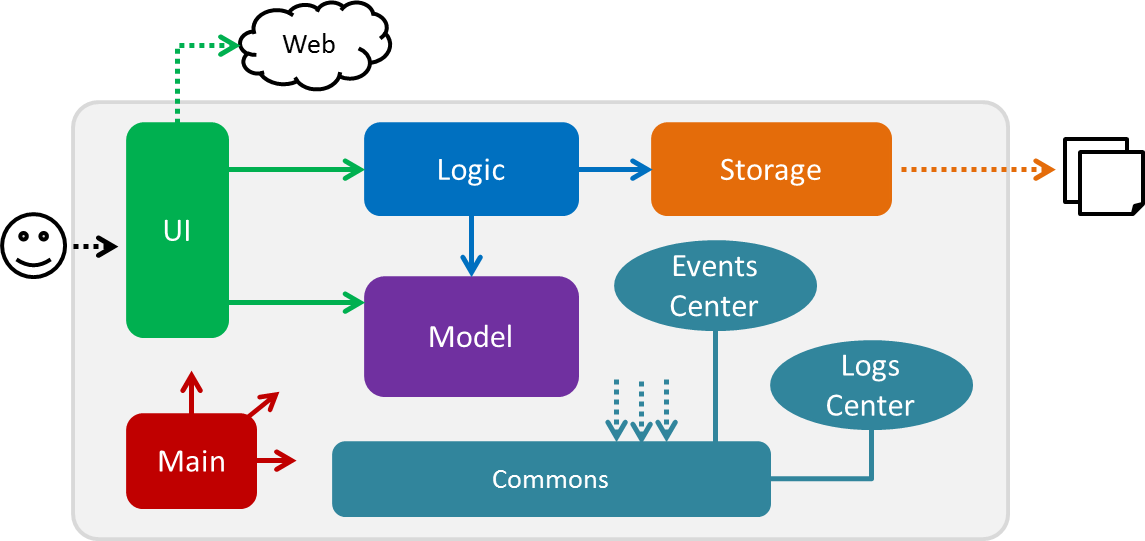
The Architecture Diagram given above explains the high-level design of the App. Given below is a quick overview of each component.
The .pptx files used to create diagrams in this document can be found in the diagrams folder. To update a diagram, modify the diagram in the pptx file, select the objects of the diagram, and choose Save as picture.
|
Main has only one class called MainApp. It is responsible for,
-
At app launch: Initializes the components in the correct sequence, and connects them up with each other.
-
At shut down: Shuts down the components and invokes cleanup method where necessary.
Commons represents a collection of classes used by multiple other components. Two of those classes play important roles at the architecture level.
-
EventsCenter: This class (written using Google’s Event Bus library) is used by components to communicate with other components using events (i.e. a form of Event Driven design) -
LogsCenter: Used by many classes to write log messages to the App’s log file.
The rest of the App consists of four components.
Each of the four components
-
Defines its API in an
interfacewith the same name as the Component. -
Exposes its functionality using a
{Component Name}Managerclass.
For example, the Logic component (see the class diagram given below) defines it’s API in the Logic.java interface and exposes its functionality using the LogicManager.java class.
Events-Driven nature of the design
The Sequence Diagram below shows how the components interact for the scenario where the user issues the command delete 1.
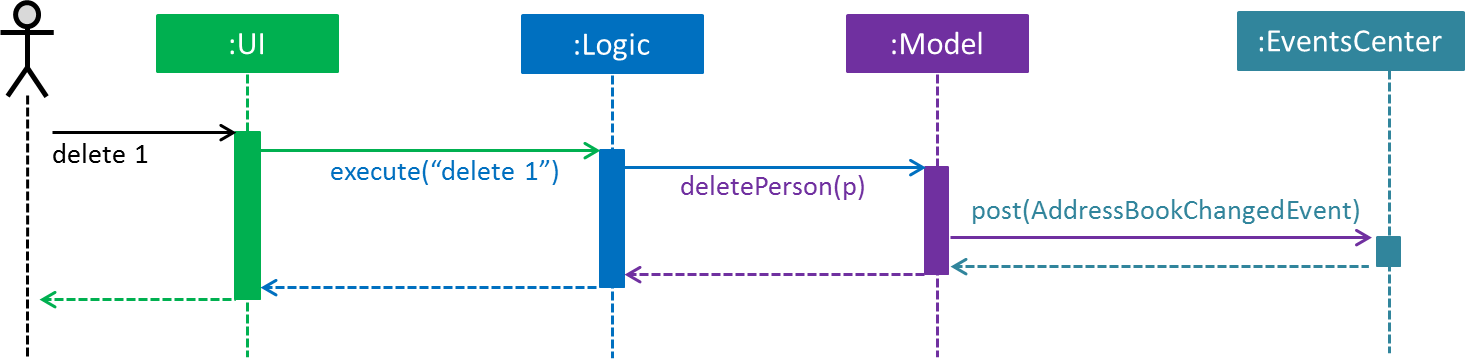
delete 1 command (part 1)
Note how the Model simply raises a AddressBookChangedEvent when the Address Book data are changed, instead of asking the Storage to save the updates to the hard disk.
|
The diagram below shows how the EventsCenter reacts to that event, which eventually results in the updates being saved to the hard disk and the status bar of the UI being updated to reflect the 'Last Updated' time.
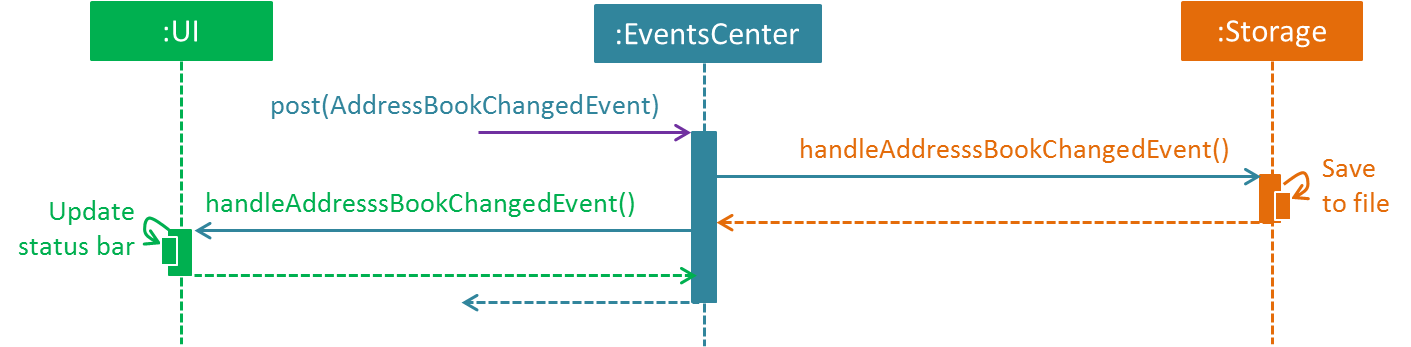
delete 1 command (part 2)
Note how the event is propagated through the EventsCenter to the Storage and UI without Model having to be coupled to either of them. This is an example of how this Event Driven approach helps us reduce direct coupling between components.
|
The sections below give more details of each component.
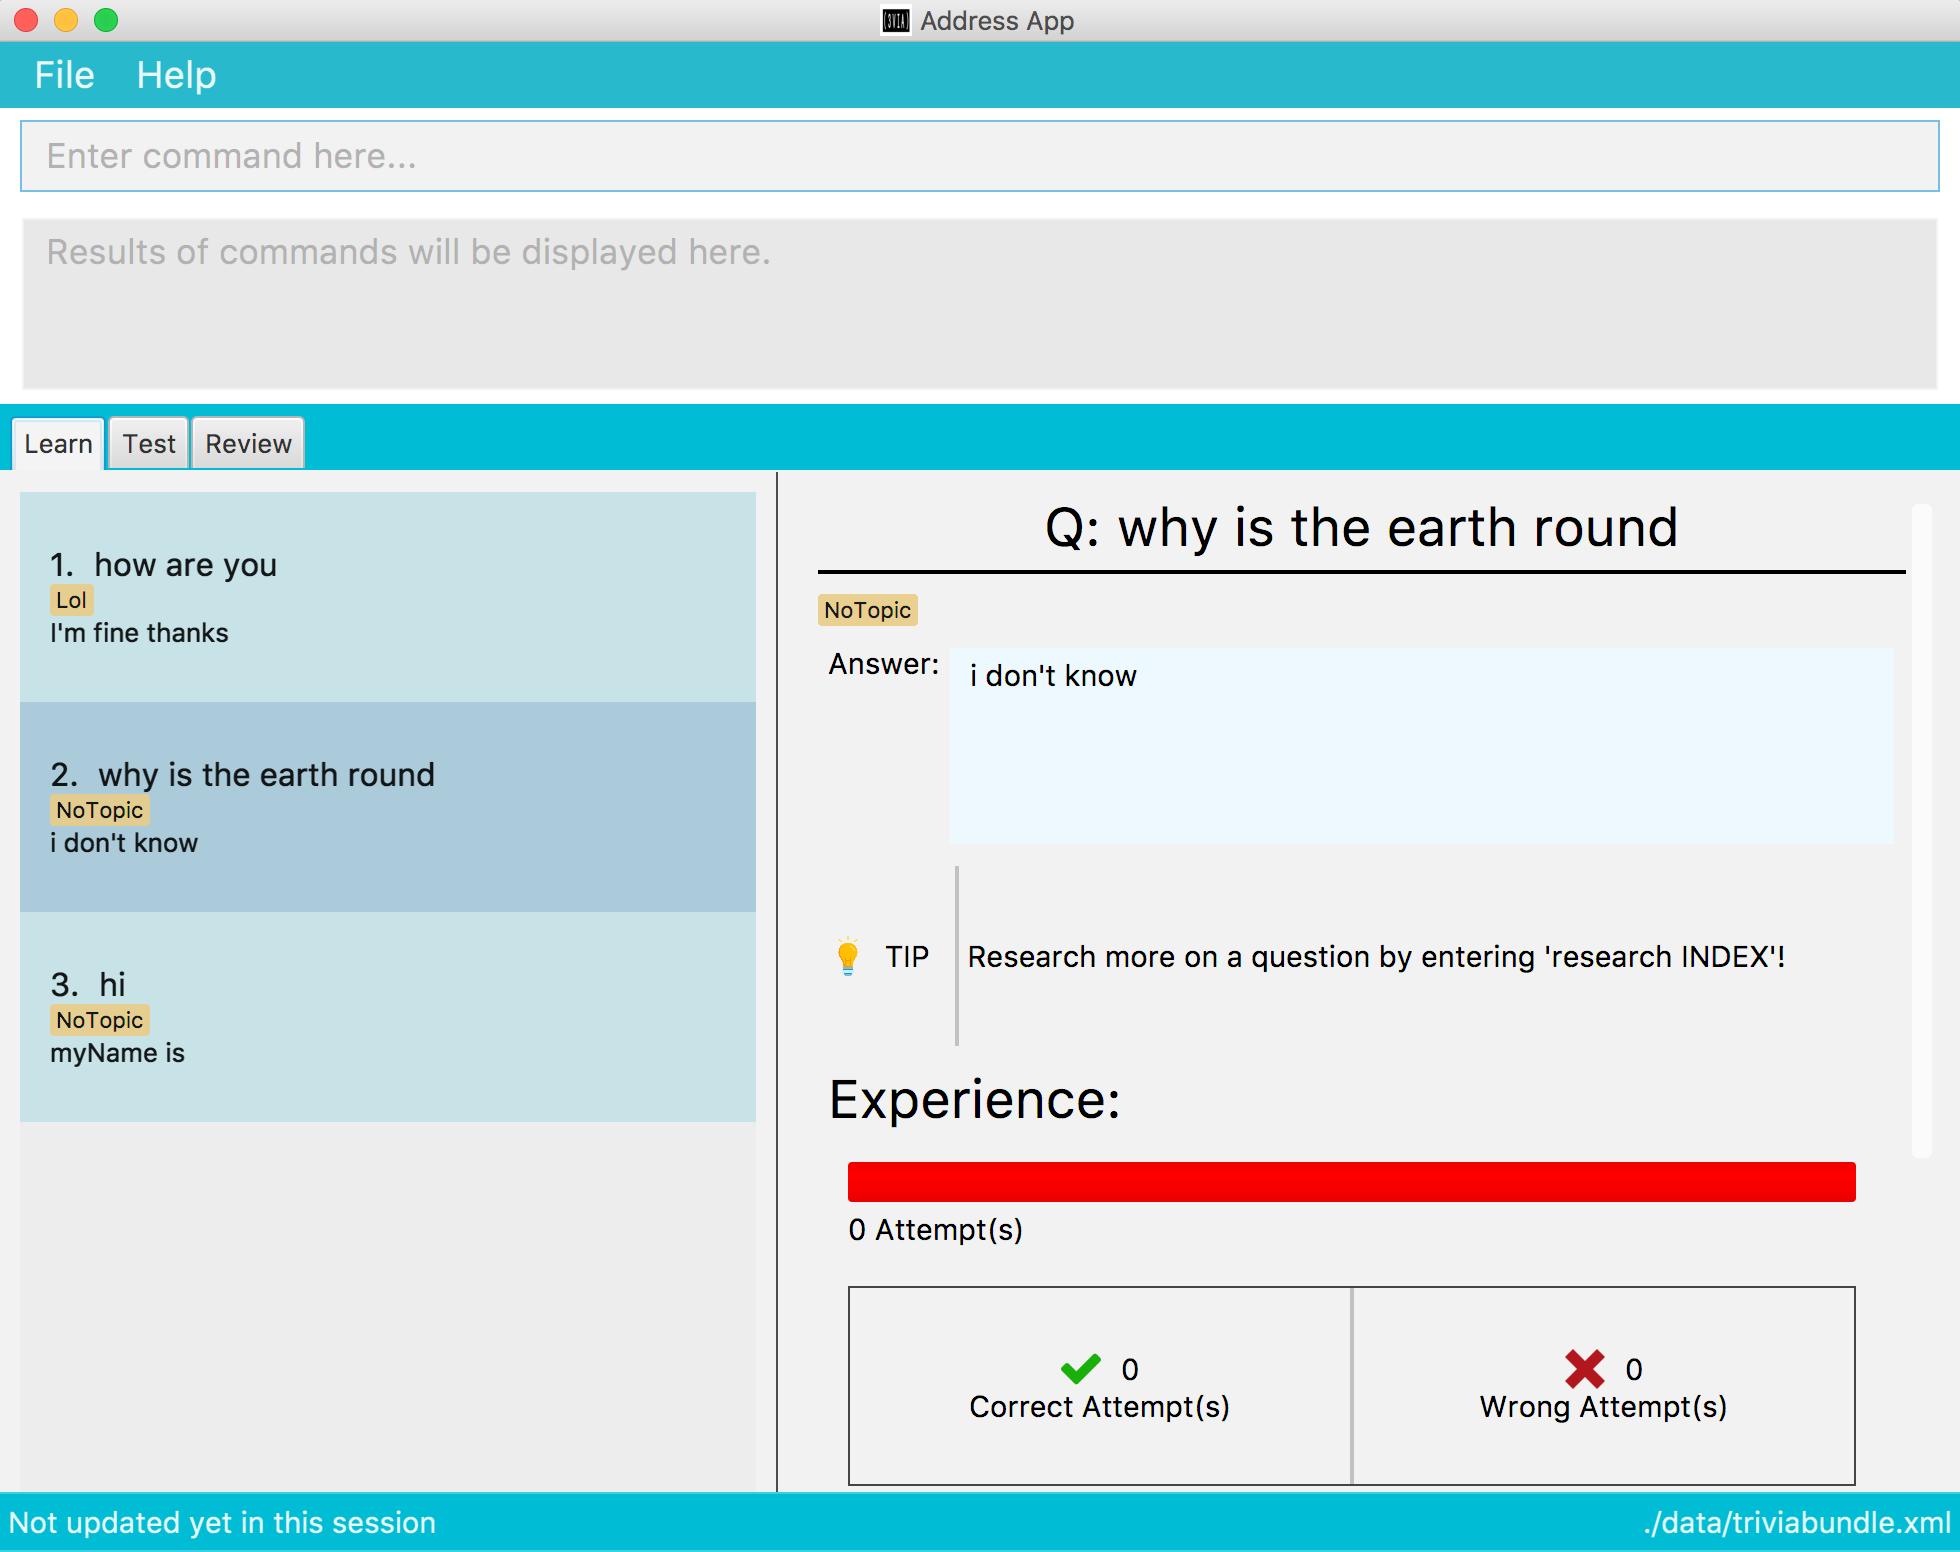
2.2. UI component
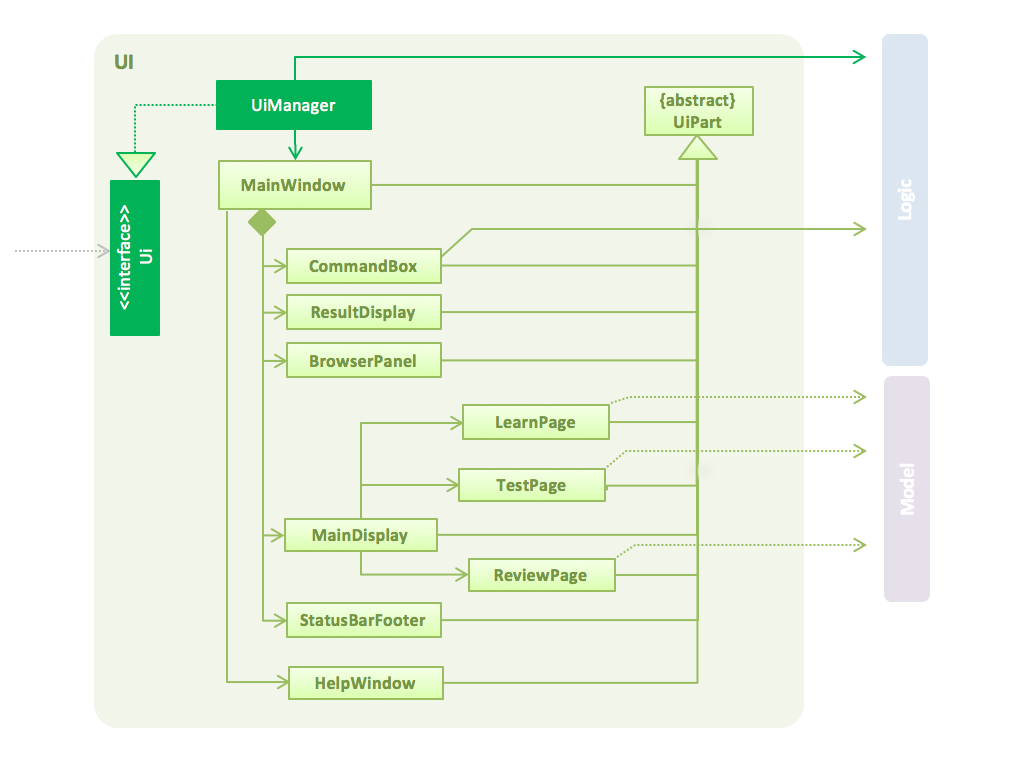
API : Ui.java
The UI consists of a MainWindow that is made up of parts e.g.CommandBox, ResultDisplay, BrowserPanel, MainDisplay, StatusBarFooter etc. All these, including the MainWindow, inherit from the abstract UiPart class.
Structure for the Test Page Component has also been modified to contain and expand the functionality of the application.
The UI component uses JavaFx UI framework. The layout of these UI parts are defined in matching .fxml files that are in the src/main/resources/view folder. For example, the layout of the MainWindow is specified in MainWindow.fxml
The UI component,
-
Executes user commands using the
Logiccomponent. -
Binds itself to some data in the
Modelso that the UI can auto-update when data in theModelchange. -
Responds to events raised from various parts of the App and updates the UI accordingly.
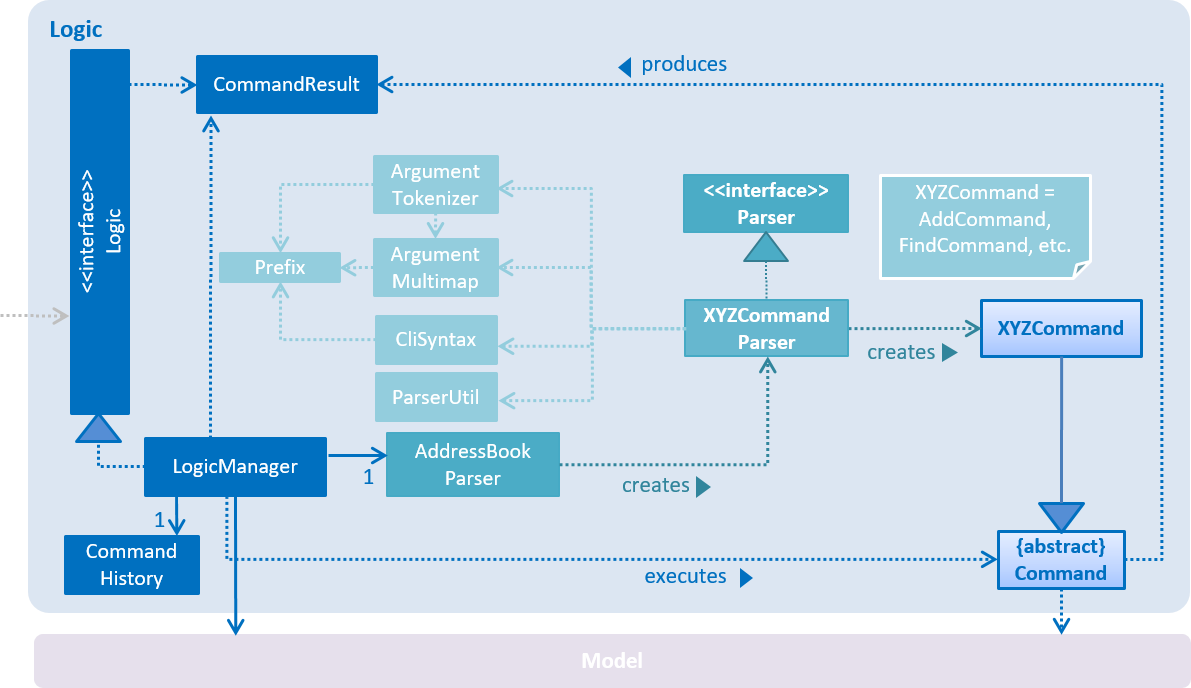
2.3. Logic component
API :
Logic.java
-
Logicuses theAddressBookParserclass to parse the user command. -
This results in a
Commandobject which is executed by theLogicManager. -
The command execution can affect the
Model(e.g. adding a person) and/or raise events. -
The result of the command execution is encapsulated as a
CommandResultobject which is passed back to theUi.
Given below is the Sequence Diagram for interactions within the Logic component for the execute("delete 1") API call.
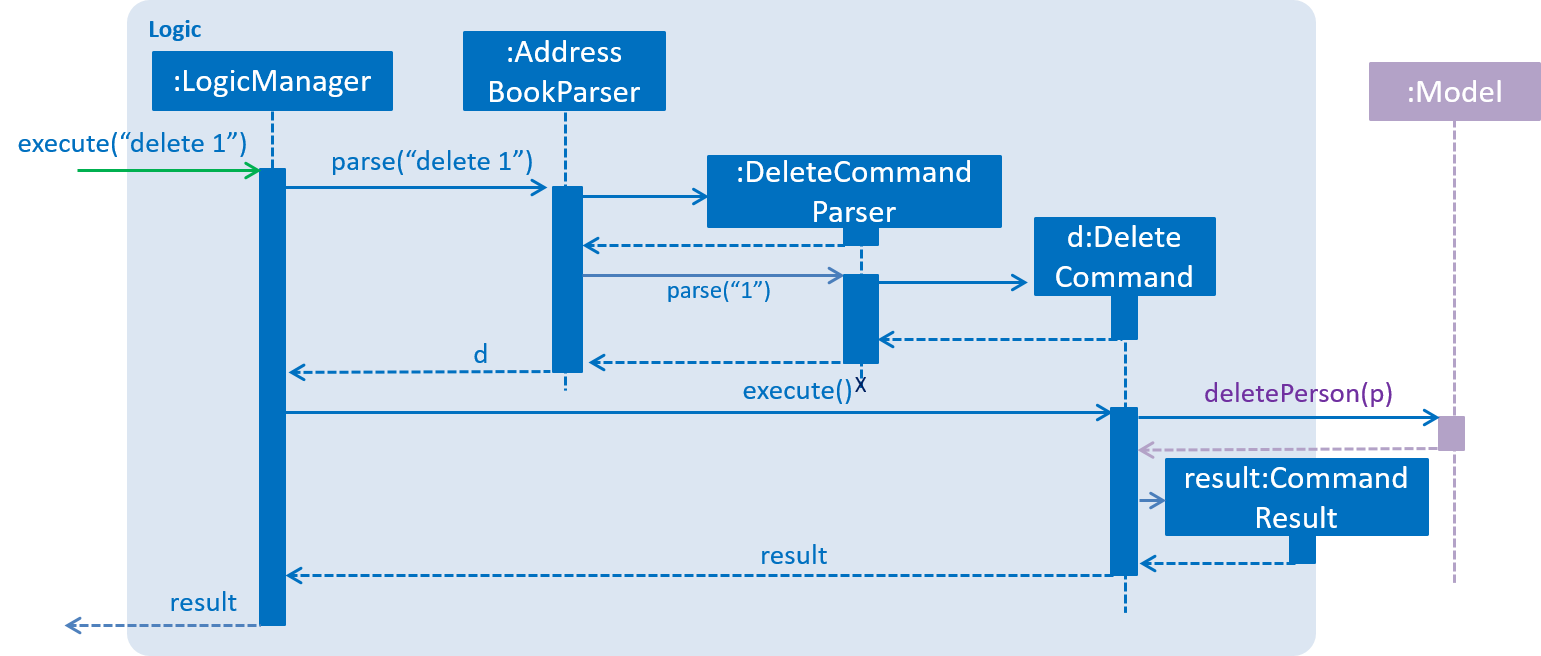
delete 1 Command2.4. Model component
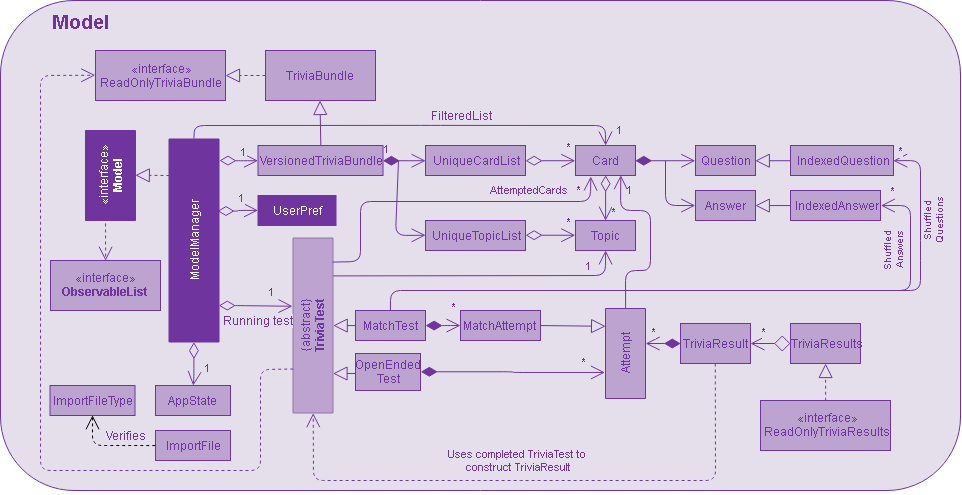
API : Model.java
The Model,
-
stores a
UserPrefobject that represents the user’s preferences. -
stores the Trivia Bundle data.
-
exposes an unmodifiable
ObservableList<Card>that can be 'observed' e.g. the UI can be bound to this list so that the UI automatically updates when the data in the list change. -
does not depend on any of the other three components.
2.5. Storage component
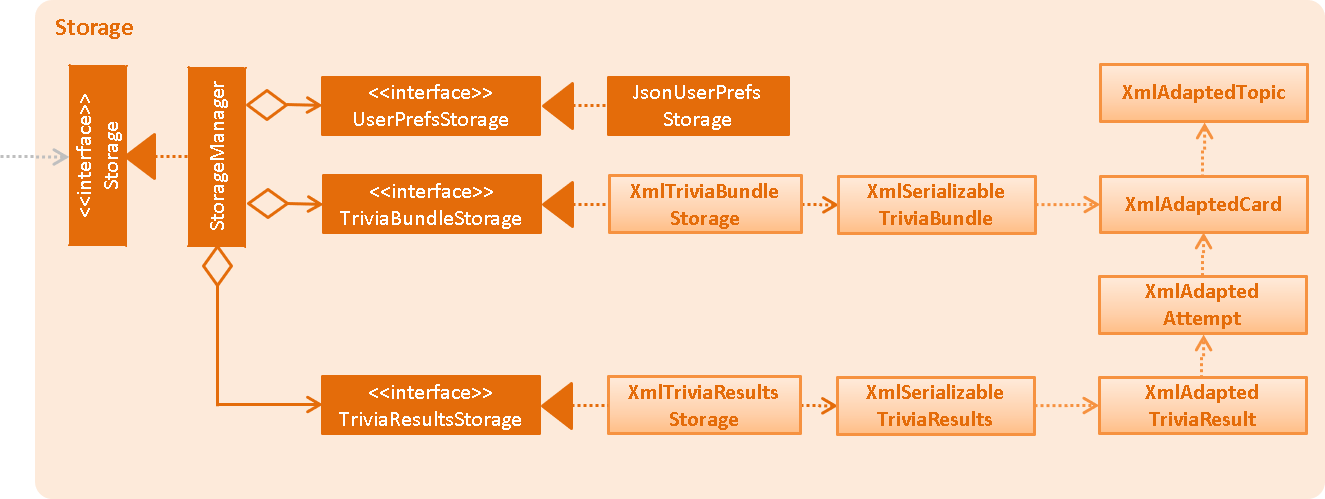
API : Storage.java
The Storage component,
-
can save
UserPrefobjects in json format and read it back. -
can save the Address Book data in xml format and read it back.
2.6. Common classes
Classes used by multiple components are in the seedu.addressbook.commons package.
3. Implementation
This section describes some noteworthy details on how certain features are implemented.
3.1. Undo/Redo Feature
3.1.1. Current Implementation
The undo/redo mechanism is facilitated by VersionedAddressBook.
It extends AddressBook with an undo/redo history, stored internally as an addressBookStateList and currentStatePointer.
Additionally, it implements the following operations:
-
VersionedAddressBook#commit()— Saves the current address book state in its history. -
VersionedAddressBook#undo()— Restores the previous address book state from its history. -
VersionedAddressBook#redo()— Restores a previously undone address book state from its history.
These operations are exposed in the Model interface as Model#commitAddressBook(), Model#undoAddressBook() and Model#redoAddressBook() respectively.
Given below is an example usage scenario and how the undo/redo mechanism behaves at each step.
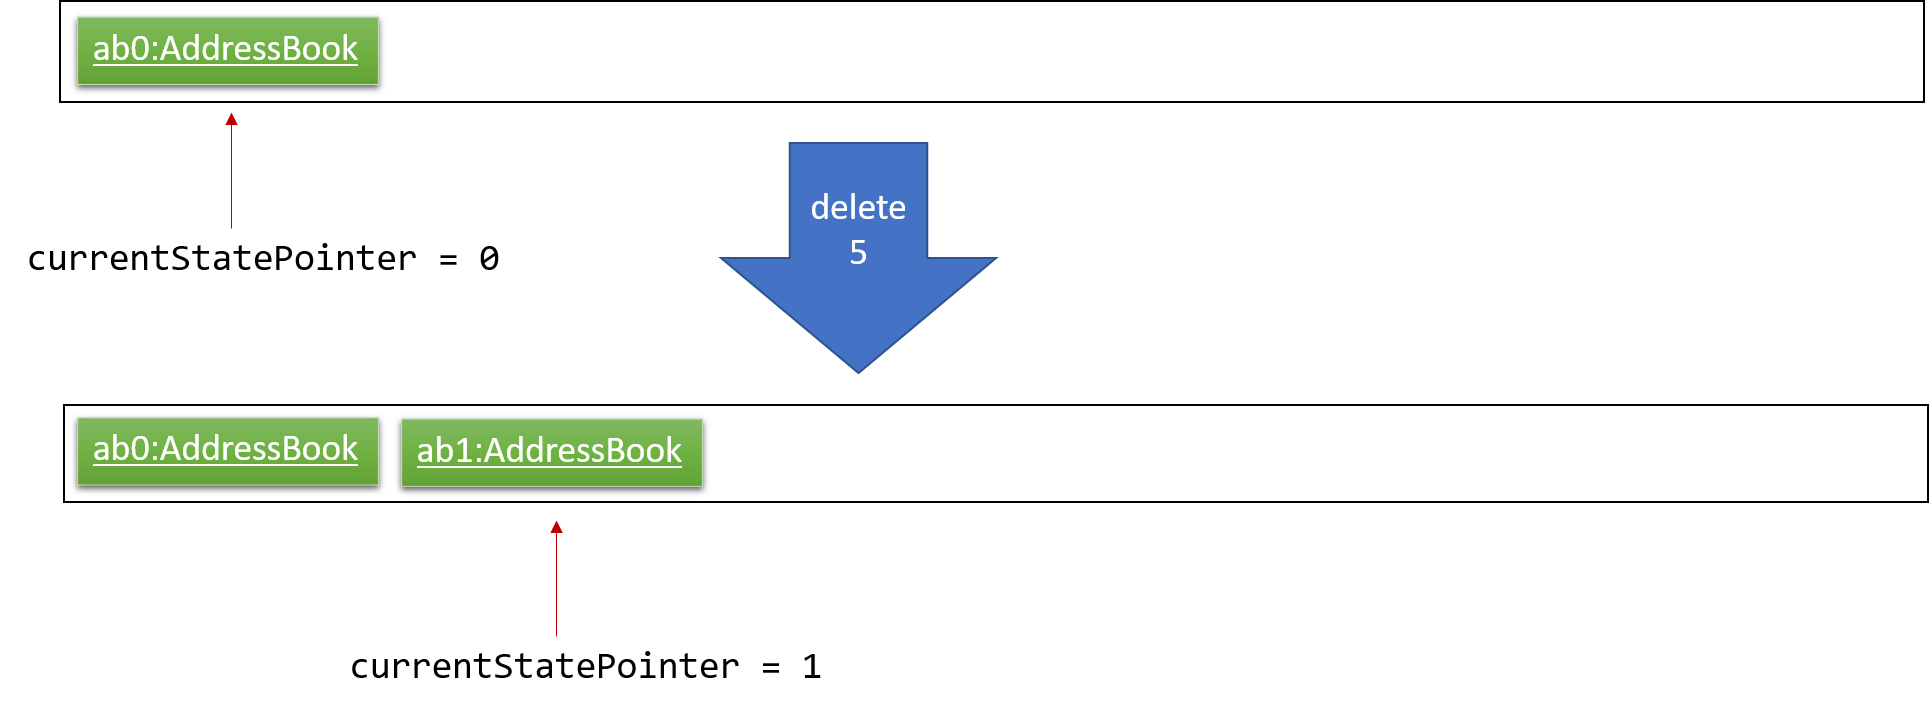
Step 1. The user launches the application for the first time. The VersionedAddressBook will be initialized with the initial address book state, and the currentStatePointer pointing to that single address book state.

Step 2. The user executes delete 5 command to delete the 5th person in the address book. The delete command calls Model#commitAddressBook(), causing the modified state of the address book after the delete 5 command executes to be saved in the addressBookStateList, and the currentStatePointer is shifted to the newly inserted address book state.
Step 3. The user executes add n/David … to add a new person. The add command also calls Model#commitAddressBook(), causing another modified address book state to be saved into the addressBookStateList.

If a command fails its execution, it will not call Model#commitAddressBook(), so the address book state will not be saved into the addressBookStateList.
|
Step 4. The user now decides that adding the person was a mistake, and decides to undo that action by executing the undo command. The undo command will call Model#undoAddressBook(), which will shift the currentStatePointer once to the left, pointing it to the previous address book state, and restores the address book to that state.
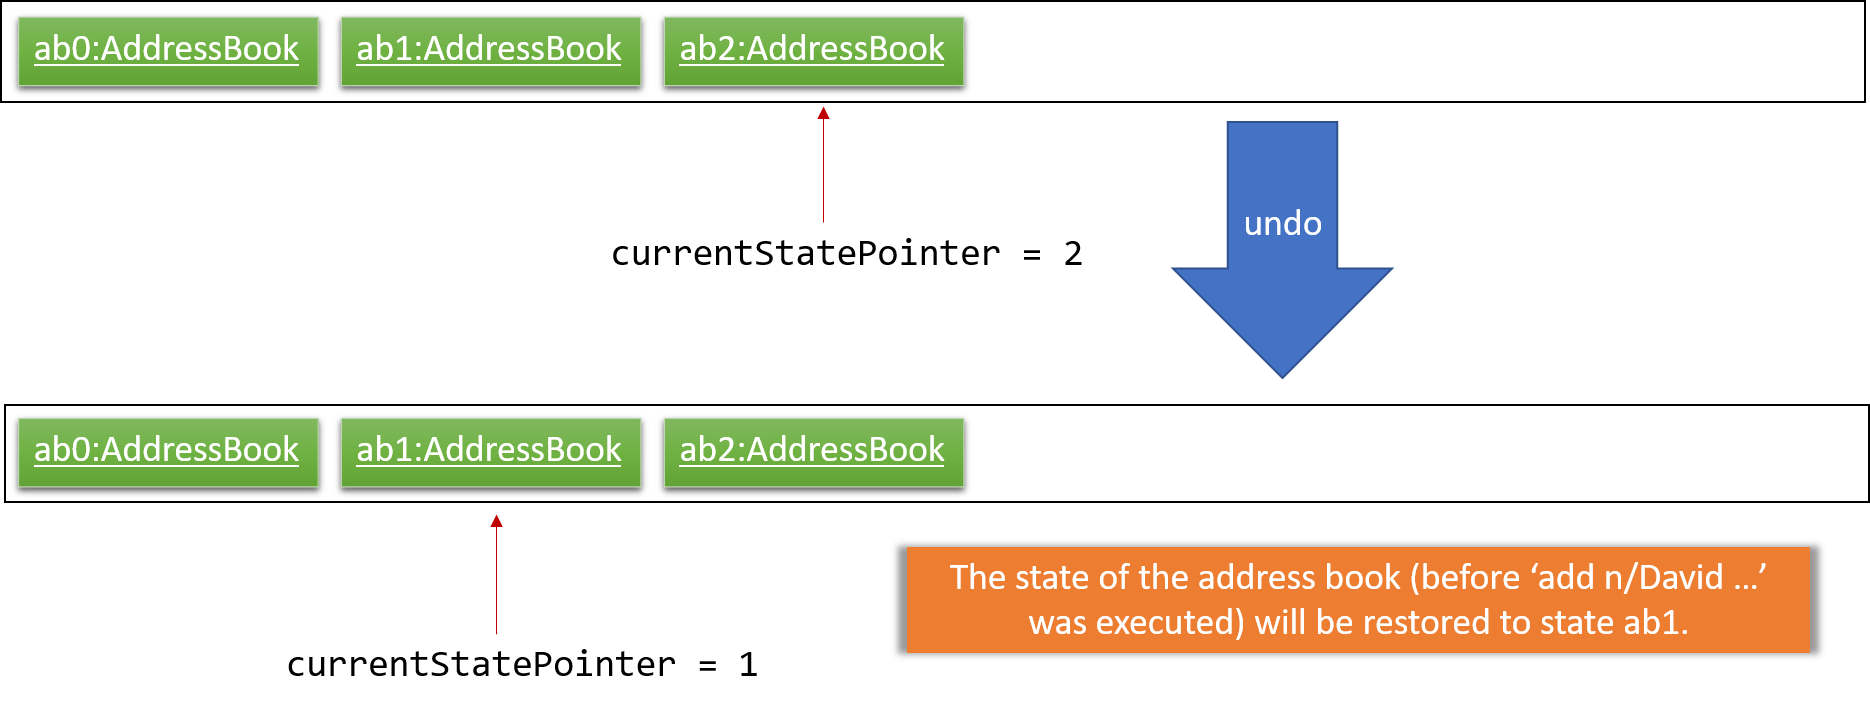
If the currentStatePointer is at index 0, pointing to the initial address book state, then there are no previous address book states to restore. The undo command uses Model#canUndoAddressBook() to check if this is the case. If so, it will return an error to the user rather than attempting to perform the undo.
|
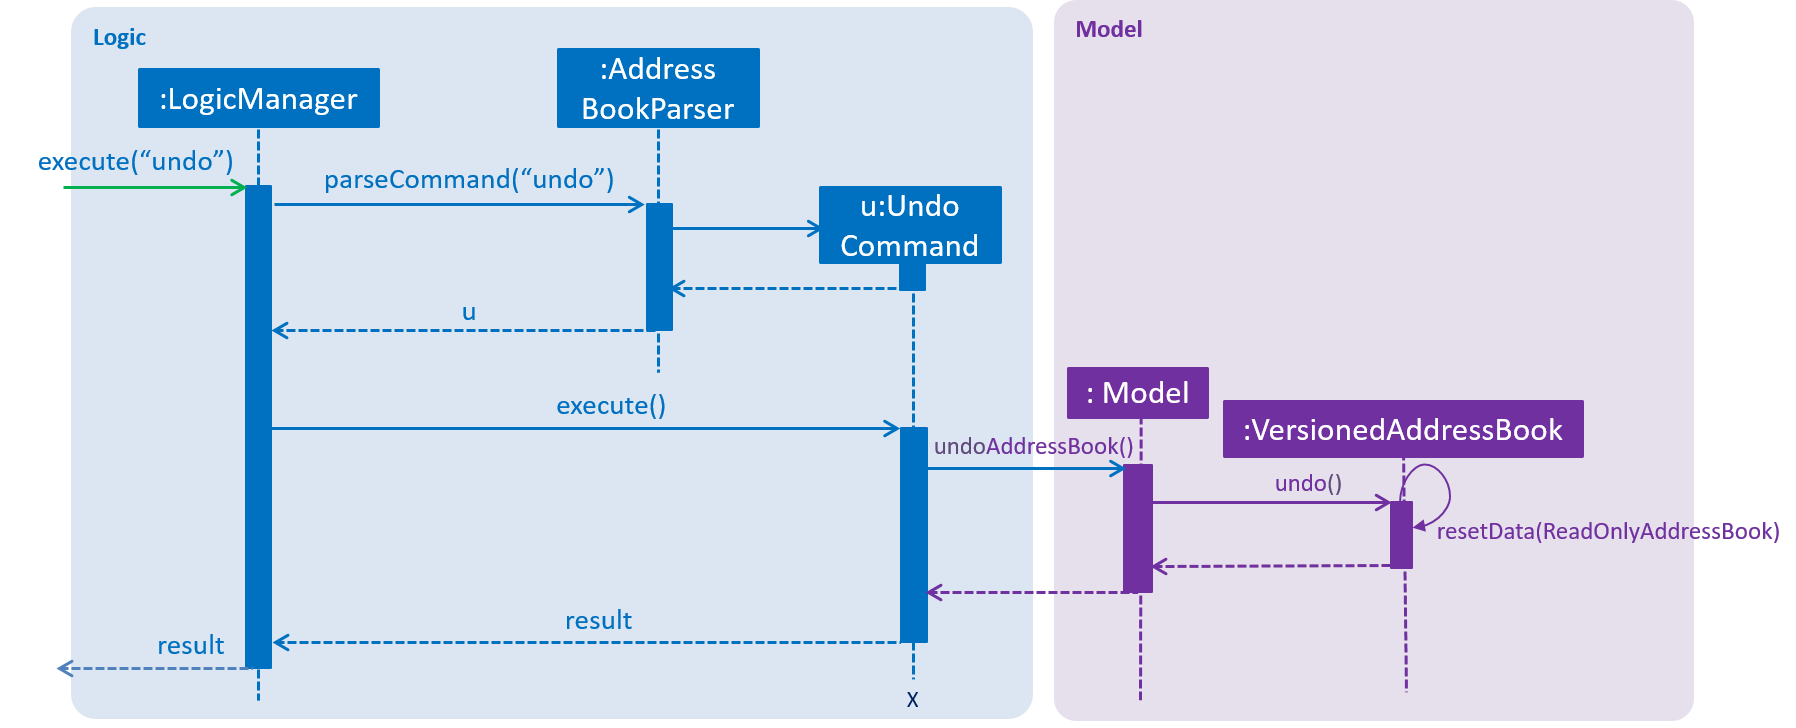
The following sequence diagram shows how the undo operation works:
The redo command does the opposite — it calls Model#redoAddressBook(), which shifts the currentStatePointer once to the right, pointing to the previously undone state, and restores the address book to that state.
If the currentStatePointer is at index addressBookStateList.size() - 1, pointing to the latest address book state, then there are no undone address book states to restore. The redo command uses Model#canRedoAddressBook() to check if this is the case. If so, it will return an error to the user rather than attempting to perform the redo.
|
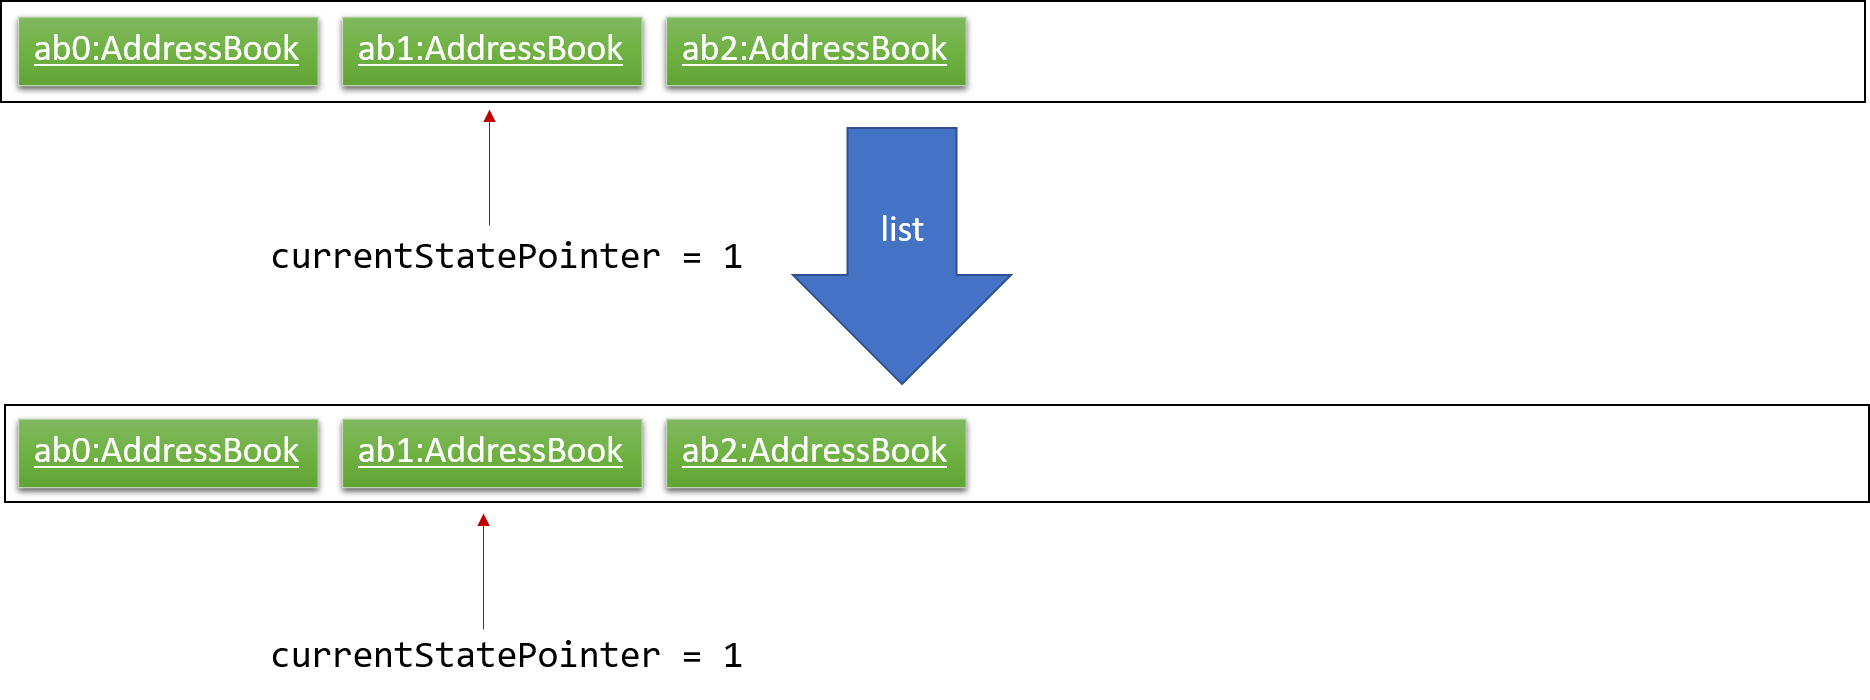
Step 5. The user then decides to execute the command list. Commands that do not modify the address book, such as list, will usually not call Model#commitAddressBook(), Model#undoAddressBook() or Model#redoAddressBook(). Thus, the addressBookStateList remains unchanged.
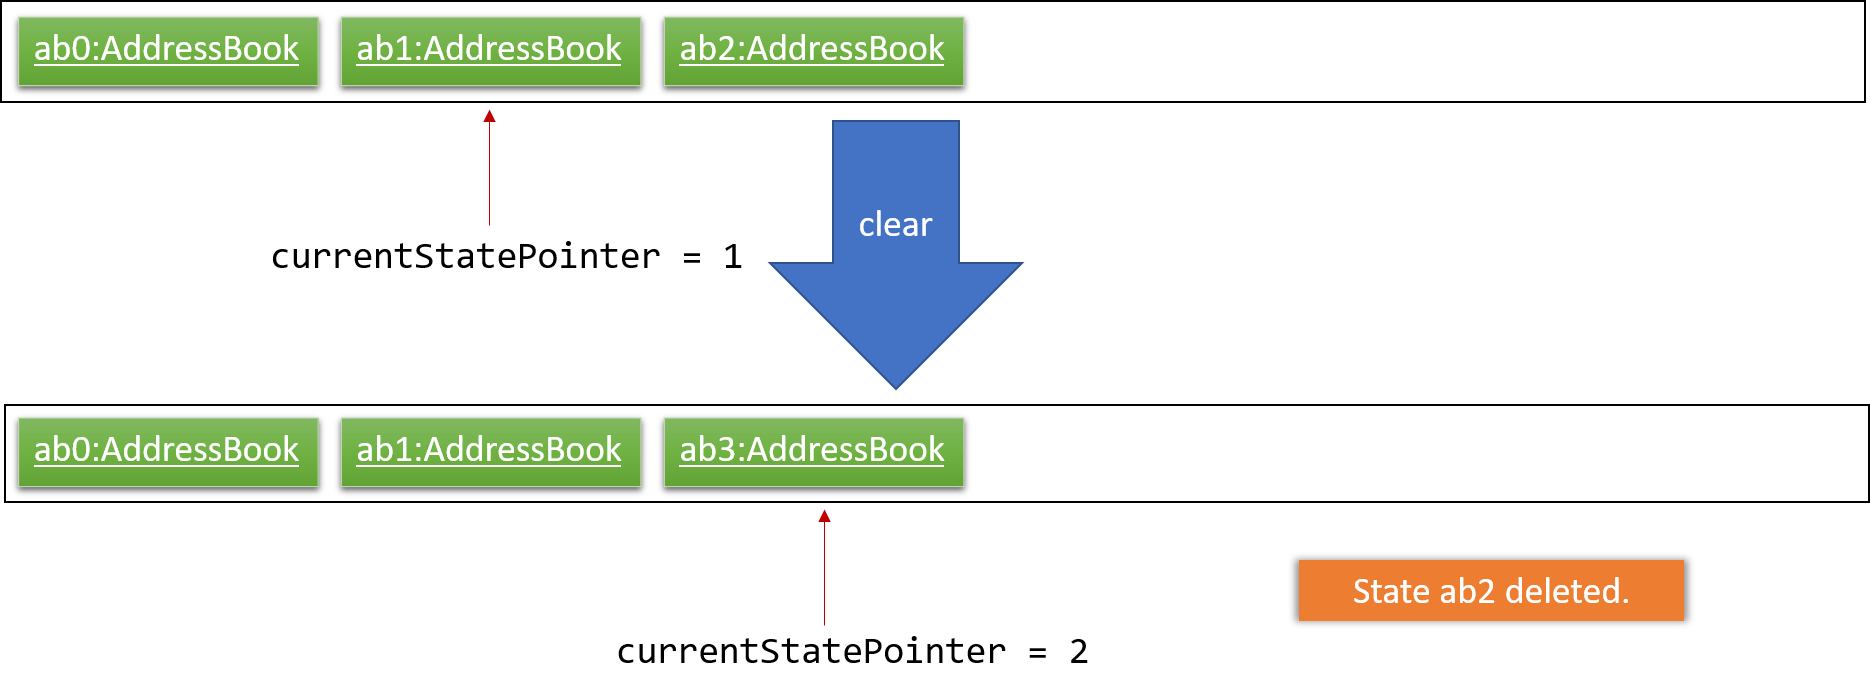
Step 6. The user executes clear, which calls Model#commitAddressBook(). Since the currentStatePointer is not pointing at the end of the addressBookStateList, all address book states after the currentStatePointer will be purged. We designed it this way because it no longer makes sense to redo the add n/David … command. This is the behavior that most modern desktop applications follow.
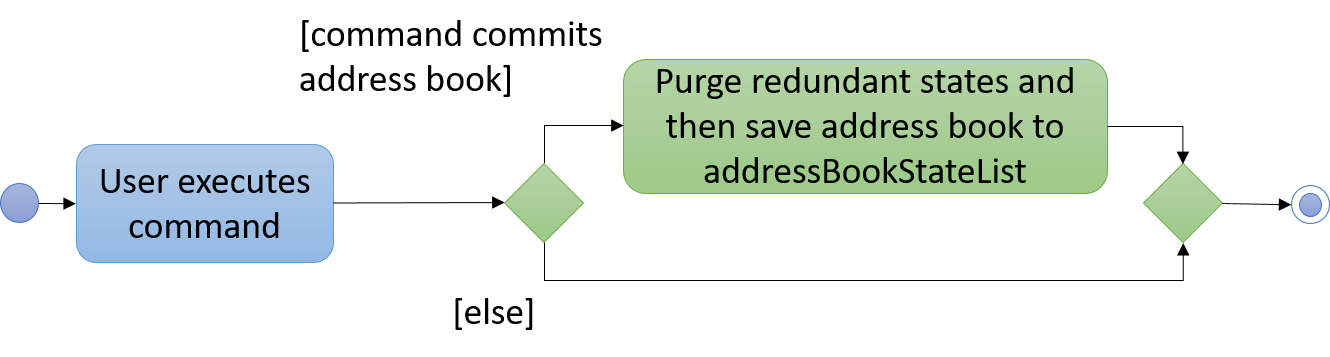
The following activity diagram summarizes what happens when a user executes a new command:
3.1.2. Design Considerations
Aspect: How undo & redo executes
-
Alternative 1 (current choice): Saves the entire address book.
-
Pros: Easy to implement.
-
Cons: May have performance issues in terms of memory usage.
-
-
Alternative 2: Individual command knows how to undo/redo by itself.
-
Pros: Will use less memory (e.g. for
delete, just save the person being deleted). -
Cons: We must ensure that the implementation of each individual command are correct.
-
Aspect: Data structure to support the undo/redo commands
-
Alternative 1 (current choice): Use a list to store the history of address book states.
-
Pros: Easy for new Computer Science student undergraduates to understand, who are likely to be the new incoming developers of our project.
-
Cons: Logic is duplicated twice. For example, when a new command is executed, we must remember to update both
HistoryManagerandVersionedAddressBook.
-
-
Alternative 2: Use
HistoryManagerfor undo/redo-
Pros: We do not need to maintain a separate list, and just reuse what is already in the codebase.
-
Cons: Requires dealing with commands that have already been undone: We must remember to skip these commands. Violates Single Responsibility Principle and Separation of Concerns as
HistoryManagernow needs to do two different things.
-
3.2. Mass Import Feature
3.2.1. Current implementation
The import mechanism allows the user to add multiple cards quickly into 3VIA. This is done by parsing an external file in a specified format and file type but with minimal syntax.
The import mechanism is facilitated mainly by ImportFile and TriviaBundle.
Additionally, the import mechanism implements the following operations:
-
ImportFile#parseFileToCard()— Parses a plain text file into a unique list of cards. -
TriviaBundle#haveAnyCard()— Checks if the cards to add contain any duplicated cards already inTriviaBundle. -
TriviaBundle#addMultipleCards()— Adds multiple cards into theTriviaBundleat once.
The 2 TriviaBundle operations are exposed in the Model interface as
Model#haveAnyCard() and Model#addMultipleCards() respectively.
The following activity diagram summarizes what happens when a user executes the import command.

Given below is an example usage scenario and how the import mechanism behaves.
Step 1. The user enters the import command to import a file from an absolute or relative file path.
An ImportCommand object is initialised.
Step 2. When the ImportCommand executes, the desired import file is first verified to be valid by calling ImportFile#isFileValid().
The following checks are done:
-
#isValidFile()— the import file’s path points to a file and the file is non-empty. -
#isValidFileType()the import file is of a supported file type (i.e. plain/text file format). -
#isValidFileFormat()the import file is readable and the text in the import file is in the specified format.
Step 3. Once verified, the import file is parsed to form a unique list of cards that is stored in UniqueCardList.
An empty UniqueCardList is also considered as an import failure as no cards were parsed from the given text file.
A CommandException will be thrown, and the user is informed that no cards (question and answer pair) were found in the text file.
|
Step 4. TriviaBundle#haveAnyCard() checks every card in the UniqueCardList against the existing list of cards in TriviaBundle for duplicates.
If duplicates are found, the import fails and a DuplicateCardException is raised.
Step 5. The UniqueCardList is then added into TriviaBundle via TriviaBundle#addMultipleCards().
The number of cards and the cards imported are displayed to the user for verification.
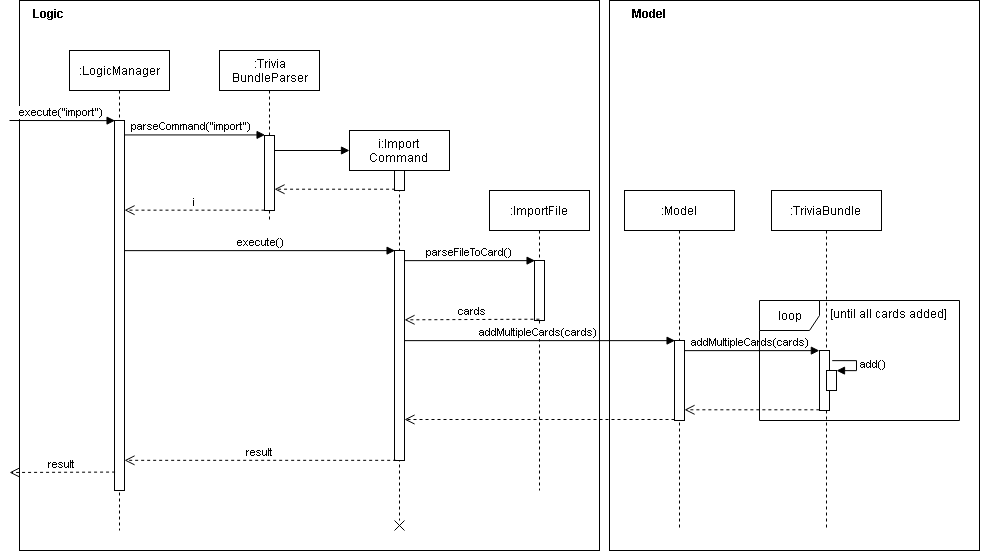
The sequence diagram below describes the import of multiple cards.
Each card is added repeatedly by invoking TriviaBundle#add() until all cards in the UniqueCardList are added.
3.2.2. Design Considerations
Aspect: Pre-import preview
-
Alternative 1: (current implementation) Single step to import cards from a text file.
-
Pros:
-
A single command can be executed quickly for an import.
-
Post import edits can be done using existing commands such as
edit,delete, etc.
-
-
Con:
-
A single formatting error in the text file will result in an import failure.
-
-
-
Alternative 2: 'Stages' the import file by first previewing the imported cards to the user. Edits to the import file can be done directly to the text file within the application during this phase. The actual import is then done upon confirmation.
-
Implementation details:
-
Given below is a class diagram describing the structure for the alternative import implementation.

-
The
Formatclass verifies the formatting of theImportFile, marks and displays the errors of the text file within the application for editing.The
FileParseris dependent onFormatto determine whether each line in the text file is a topic or a question and an answer pair. TheFileParserparses theImportFileinto aUniqueCardListto be added.The
ObservableFileinterface allows the UI component to update the preview of the cards each time the file is edited without a direct dependency to it.
-
-
Pro:
-
Allows the user to identify errors in formatting and correct them directly in the application.
-
-
Con:
-
An additional step (command) is required to successfully import the cards into the application.
-
-
Aspect: How import executes
-
Alternative 1 (current choice): Store all cards to be added in
TriviaBundlebefore writing to file on the hard disk.-
Pro: Less IO intensive as only one write to file is needed.
-
Con: May have heap memory issue if large amount of cards are stored temporarily.
-
-
Alternative 2: Writes a card to a xml file after each card is added.
-
Pro: Easy to implement.
-
Con: May have performance issue when large amount of cards are added.
-
Aspect: How the import file is parsed
-
Alternative 1 (current choice): Tokenize strings according to defined characters between question and answer, and between cards.
-
Pro: Allows the user to undo/ redo an import as the execution of the import only executes
VersionedTriviaBundle#commit()once. -
Con: May have memory performance issue as multiple cards are stored temporarily in the
TriviaBundle.
-
-
Alternative 2 (current choice): Tokenize strings based on the
AddCommandinput format.-
Pro: Easy to implement as it allows reuse of the
AddCommandfunctions. -
Con: Unable to undo/ redo import of cards as the execution of the import command executes
VersionedTriviaBundle#commit()multiple times. A successful undo/ redo of the import of all cards would require multiple executions of the undo/ redo command.
-
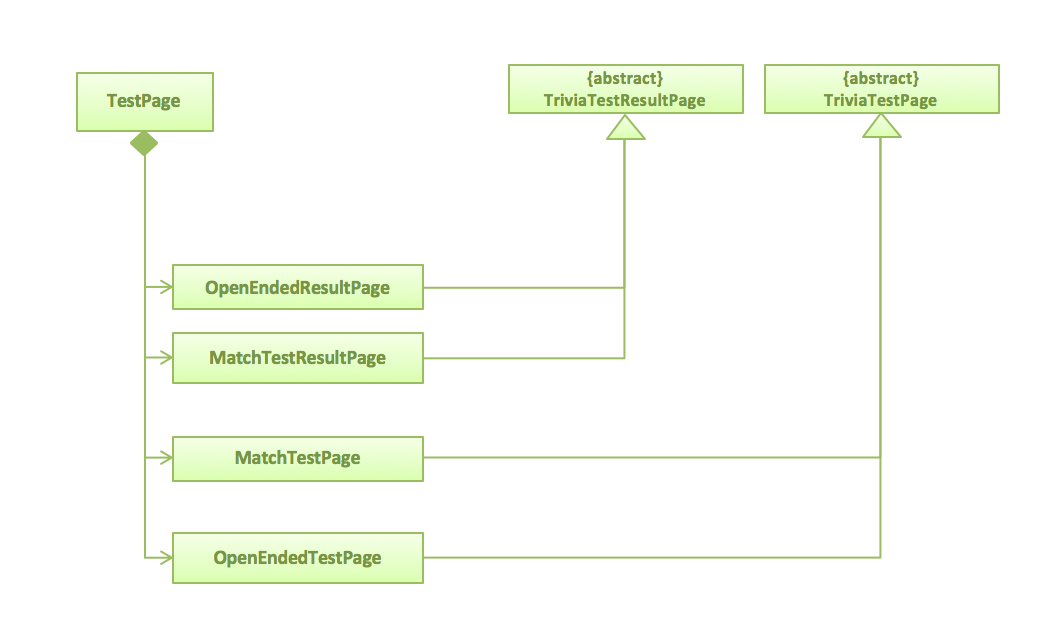
3.3. Structure of TriviaTest
3.3.1. Current Implementation
The term TriviaTest refers to a reference to the different kinds of testing features in 3VIA. Currently,
there are 2 test features in 3VIA, namely, the Open-Ended Test and the MatchTest.
Hence, the generic TriviaTest related classes were made to accommodate for the similarities between them. The classes that were
constructed spans across the Model, Storage and UI component. For Model, we have TriviaTest, TriviaResult, as shown in
Model Diagram. For Storage, we have
TriviaResultsStorage, as shown in Storage Diagram.
For UI, we have TriviaTestPage and TriviaTestResultPage, as shown in UI Diagram.
3.3.2. Design Considerations
The polymorphism of TriviaTest
-
Alternative 1 (current choice): Uses different generic classes to accommodate the different testing feature in 3VIA.
-
Pros: Follows Open-Close Principle which increases the extensibility of the testing feature in 3VIA. It will also Increase the re-usability of similar codes.
-
Cons: The implementation of different tests have to follow the structure of TriviaTest very strictly.
-
-
Alternative 2: Implement each kinds of test as a standalone test with its own standalone class and event handlers.
-
Pros: Easy to implement and each developer will have their freedom of how to implement their own test.
-
Cons: Will lead to code that is increasingly not manageable.
-
The Model for TriviaTest’s Results
-
Alternative 1 (current choice): Another Model called
TriviaResultis created to initialize the past TriviaTest’s tests and attempts.-
Pros: By creating
TriviaResultinstead of usingTriviaTestfor recording any pastTriviaTestrecords, we can reduce the amount of data collected. Hence, improving the performance (e.g. the start up time) of the application.
-
-
Alternative 2: Use
TriviaTestitself to initialize the past TriviaTest’s tests and attempts.-
Pros: Since
TriviaResultis a subsetTriviaTest, it is possible to remove the need ofTriviaResult, thereby reducing the coupling and dependencies of the application’s Model component. -
Cons: However, rebuilding a new but completed
TriviaTestwould be tedious and complicated. Hence,TriviaResultis needed separate the complexities that are involved in data collection and the actual implementation ofTriviaTest.
-
3.4. MatchTest Feature
3.4.1. Current Implementation
This feature is facilitated by the AppState and MatchTest model.
The AppState model defines the state of which the application is in. And the MatchTest model is a subclass of
TriviaTest.
Additionally, MatchTest also implements the following operations:
-
MatchTest#startTest()— Does the necessary initialisations to start aMatchTest. -
MatchTest#stopTest()— Does the necessary clean up to stop aMatchTest. -
MatchTest#match(questionIndex, answerIndex)— Matches the question to the answer.
These operations are exposed in the Model interface as Model#startTriviaTest(), Model#stopTriviaTest() and Model#MatchQuestionAndAnswer respectively.
The following activity diagram shows the complete lifecycle of a MatchTest.
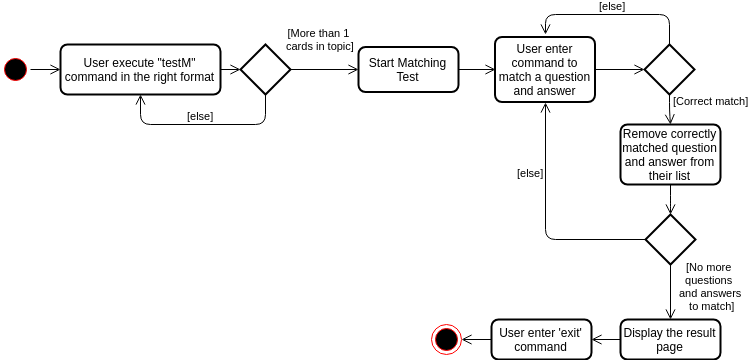
The sequence below is an example scenario and how the MatchTest behaves at each step.
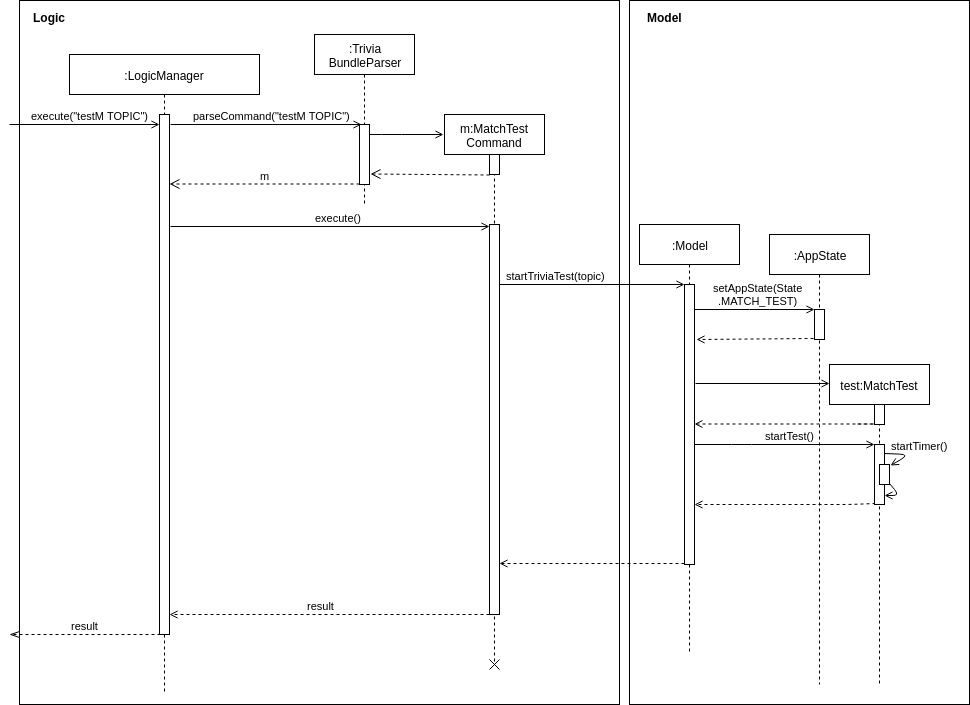
Step 1. User enters the testM command and a new MatchTestCommand will be created and executed, triggering a
string of events as shown in the sequence diagram below.
Step 2. After the MatchTest has been started, the user can only input the following commands:
-
QUESTION_INDEX ANSWER_INDEXWill be used to specify which question will be matched to the specified answer. -
ANSWER_INDEXAnother way to match the question (at the top of the question list) to its specified answer. -
exitIf the user inputexitduring aMatchTest, theMatchTestwill end and the information related to thatMatchTestwill not be recorded.
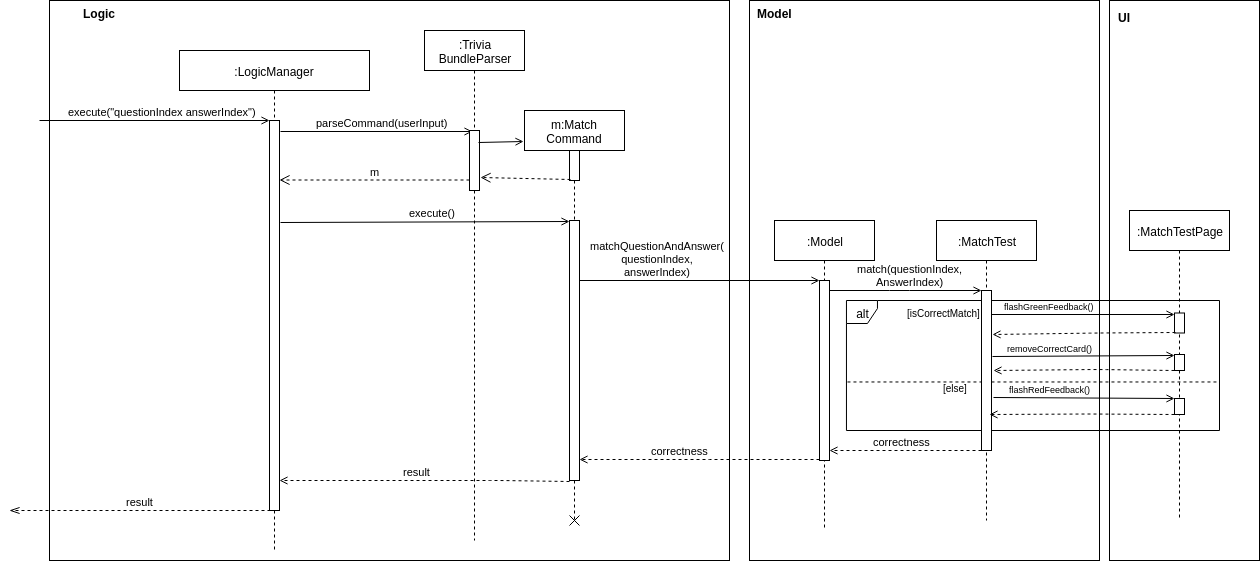
Step 3. Suppose the user choose to match a question to an answer, a list of steps will be executed as shown in the sequence diagram below.
Step 4. If there are still existing unmatched questions and answers, the System will go back to step 3.
Step 5. After all the question and answers are matched, the System will store the results on the hard disk and display the test’s result.
Step 6. At this stage, the System will await exit command from the user so that user can be taken back to the test menu page.
3.4.2. Design Considerations
UI related considerations during a MatchTest
-
Below are the different aspect of the UI in the
MatchTestthat have been considered.-
The UI feedback that are involved after the execution of
MatchCommand-
Due to the possibility of having to match a lot of questions and answers, after each successful match, the question and answer that are matched correctly will be removed. In addition, to improve user experience, a colored flash will be flashed before their removal.
-
-
The Index of the question and answer
-
The index of the question and answer is important because the user would be using it to identify which question is to be matched to which answer. The easy way to do this was to let
ListViewdo it’s job of re-indexing whenever an item is removed. However, doing so will cause confusion to the user as the index that is used to represent an item is now used to represent another item. Hence, inMatchTest, we have made the Indexes static.
-
-
The commands involved in matching
-
The basic way for the user to matching a question to an answer is for them to provide the Index of the question and answer. However, when the list of questions and answers are long, the user will have problem keeping track of 2 lists. Hence, an alternative way is to require the user just key in the Index of the answer, and 3VIA will match the first question in the list to that specified answer. This is more intuitive because the user just need to scroll through the answer list, allowing user to focus on finding the answer to match the first question.
-
-
The static display indexes of the ListView for question and answer
-
Alternative 1 (current choice): Created new classes namely,
IndexedQuestionandIndexedAnswerto uniquely identify the cells inListView.-
Pros: Finding the exact question and answer is easy as what the user see is a representative of the Id that identifies the question/answer.
-
Cons: Currently, the classes created are for the sole purpose of having static display indexes during
MatchTest.
-
-
Alternative 2: Create a
Listof mapping that maps the actual index to the display index of the question and answer.-
Cons: Additional work is required to maintain the
Listdata structure, to ensure that it is updated every time a question or answer is removed from the UI.
In addition, The questions and answers are displayed usingListView, and since the mapping of actual index to display index is not an attribute to the question/answer, the mapping needs to be passed into the UI component. This mapping will then be used by the constructor ofListViewto create a static display index of question and answer. Hence, this design consideration was not implemented due to abstraction that is leaking into the UI.
-
3.5. Open Ended Test
3.5.1. Current Implementation
The implementation of an OpenEndedTest is facilitated by the AppState and OpenEndedTest model.
The AppState model defines the state of which the application is in, and that will affect the type of interactions the user can have with the program. The OpenEndedTest model is a subclass of
TriviaTest.
Additionally, OpenEndedTest also implements the following operations:
-
OpenEndedTest#startTest()— Does the necessary initialisations to start a OpenEndedTest. -
OpenEndedTest#stopTest()— Does the necessary clean up to stop a OpenEndedTest. -
OpenEndedTest#recordAnswer(userInput)— Records the user’s answer to a question. -
OpenEndedTest#addAttempt(userInput)— Records the user’s input of whether an attempt is correct, and stores it together with the user’s answer into an Attempt.
These operations are exposed in the Model interface as Model#startTriviaTest(), Model#stopTriviaTest(), recordAnswerToOpenEndedTest and isOpenEndedTestAnswerCorrect respectively.
The following activity diagram shows the complete lifecycle of a OpenEndedTest.
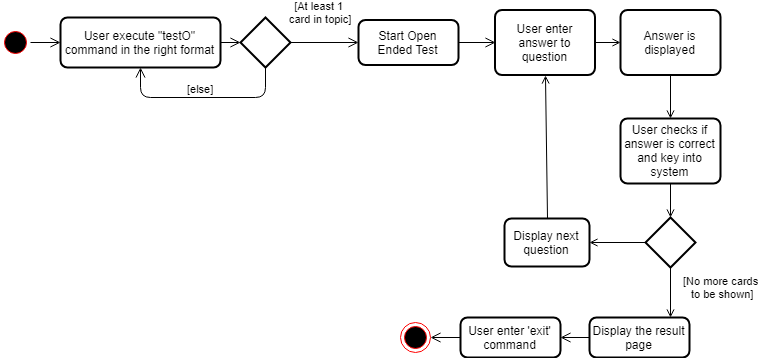
Given below is an example usage scenario and how the OpenEndedTest behaves at each step.
Step 1. The user enter theOpenEndedTest_ActivityDiagram testO command and a new OpenEndedTestCommand will be created.
Step 2. The OpenEndedTestCommand will be executed and a new OpenEndedTest Object will be created as shown in the below Sequence diagram.
Step 3. After the OpenEndedTest has been started, the user can only input the following commands:
-
USER_INPUTWill be the user’s answer to the question. It can be a blank line. [During Question State (Question is shown, waiting for user answer)]] -
IS_ANSWER_CORRECTThe user will indicate if the question was answered correctly. [During Answer State (Answer is shown, waiting for correctness)] -
exitIf the user inputexit, the OpenEndedTest will end and the information related to that OpenEndedTest will not be recorded.
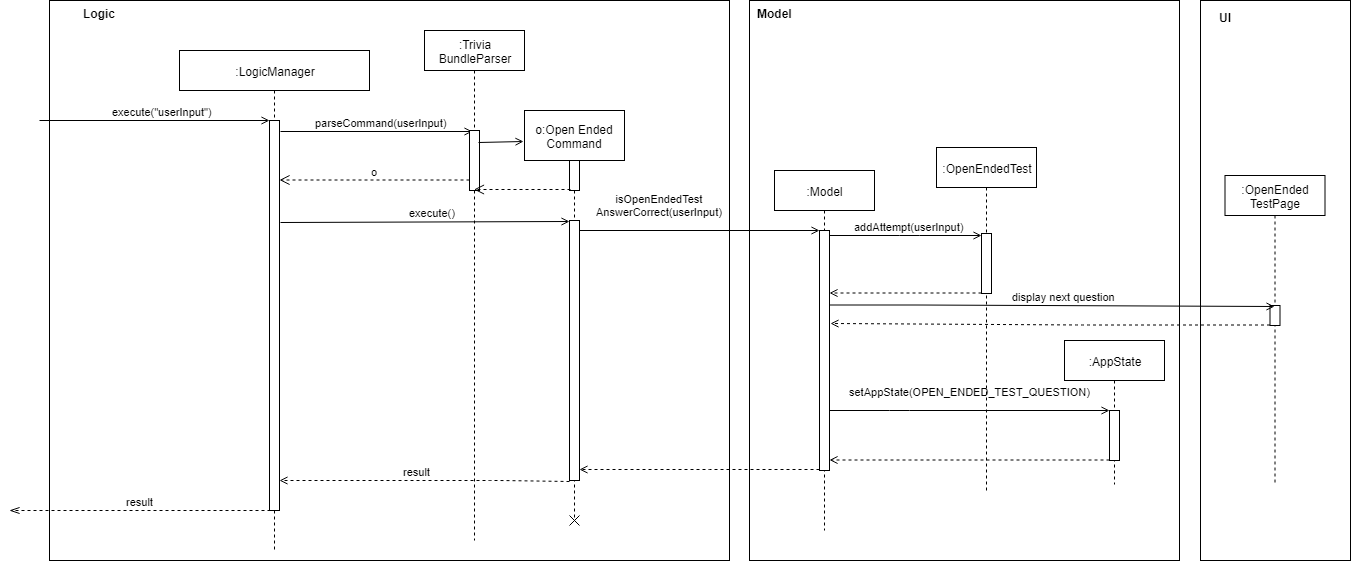
Step 4. When the user answers a question, the sequence will execute a list of steps, as shown in the sequence diagram below, to determine record the answer and display the correct answer.
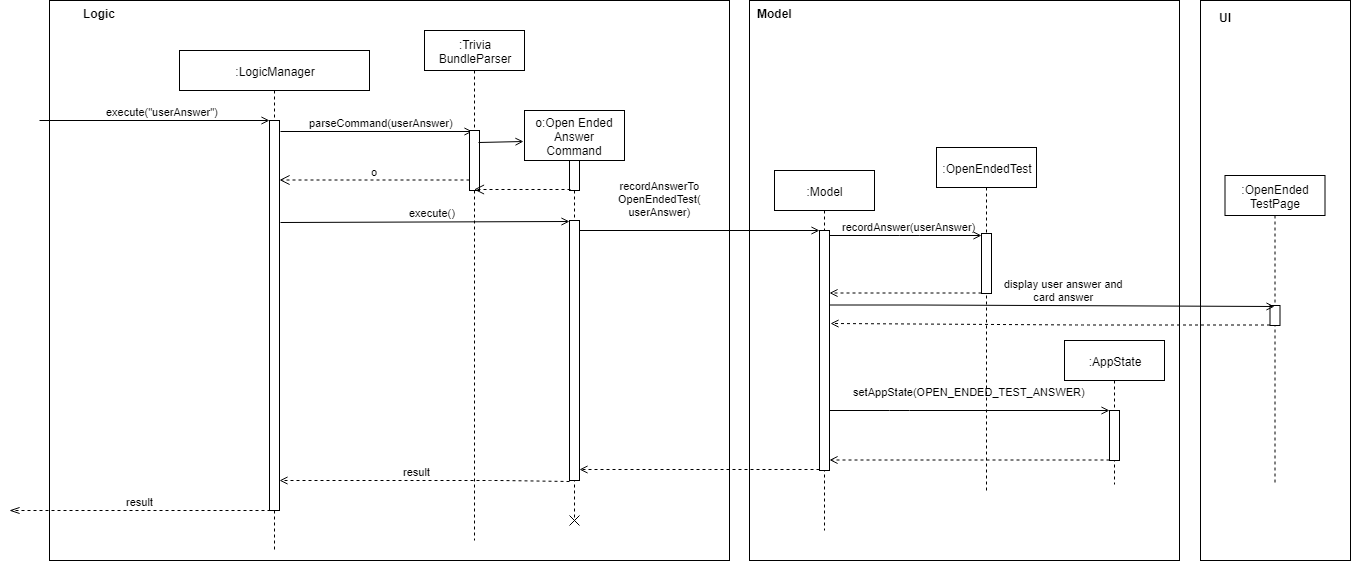
Step 5. The user will now compare the user supplied answer with the card answer and manually indicate if the user supplied answer is correct. The sequence wull execute a list of steps, as show in the sequence diagram below, to record the card, user answer and correctness into an attempt and display the next question.
Step 6. After all cards have been answered, the System will store the results on the hard disk and display the test’s result.
Step 7. At this stage, the System will await exit command from the user so that user can be taken back to the home page.
3.5.2. Design Considerations
Deciding correctness of user answer
-
Alternative 1 (current choice): Display the correct answer as well as user answer, and let the user decide if the answer is correct.
-
Pros: Flexible on the user side, easier to implement as there is no need for keywords that has to be supplied when importing cards to determine correctness when compared with user answer.
-
Cons: User determines the correctness, so it not a rigid system.
-
-
Alternative 2: Create a
Listof keywords that must be in user answer for it to be correct-
Cons: Additional work is required to determine the keywords when the cards are imported, as well as in parsing and comparing the user answer with the keywords to determine correctness.
-
3.6. Navigation Feature
3.6.1. Current Implementation
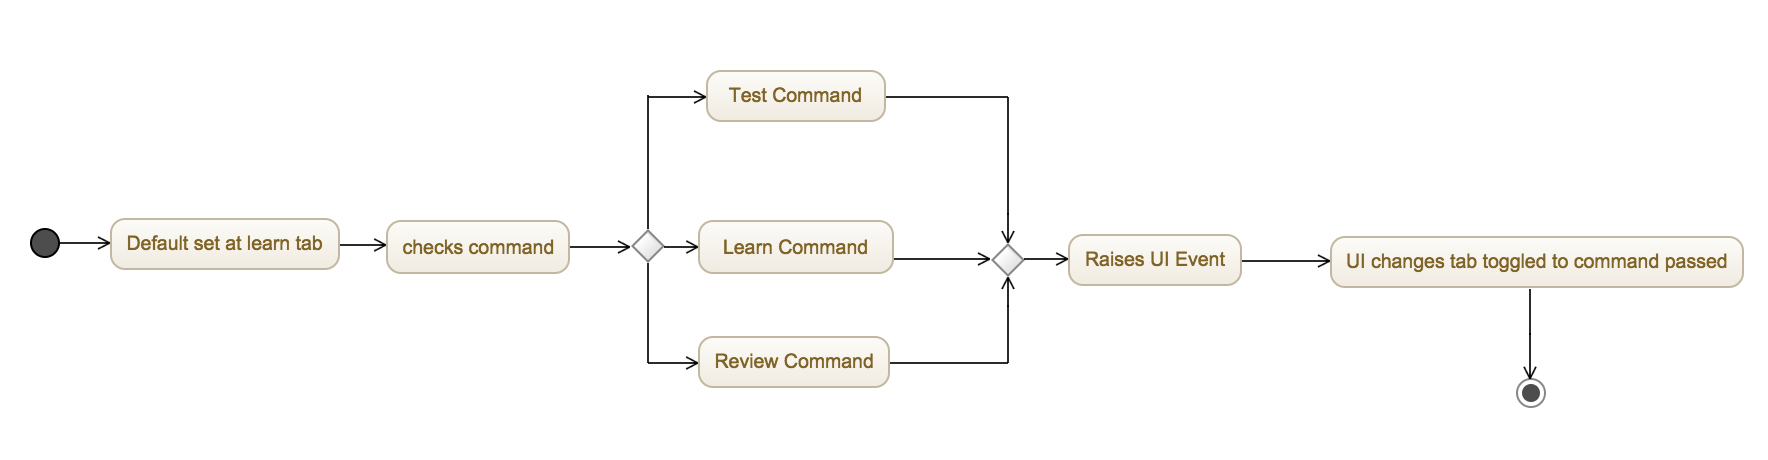
The Navigation Tab is designed for users to be aware of the different functionality of our app and paired with its relevant content. We added a navigation tab feature which can be accessed through commands of the tabs the user wants to navigate to.
The contents of the each AppState, or the functionalities of that page is attached to the tab itself, to allow the user to check and use the app more efficiently. Commands and mouse click events will handle the updating of AppState.
3.6.2. Handling event
At the present, the Navigation Tab is not a separate class on its own, and is embedded into the MainDisplay class.
Event raised is ToggleTabEvent.
GUI Handling
The tabs are expected to toggle and display their respective tab contents according to the user’s interaction:
-
Commands from Command Line Interface
-
Mouse clicks
-
Keyboard shortcuts [future release]
3.6.3. Design Considerations
Location of Navigation tab
-
Side bar
-
pros: easy to see, optimized for user experience
-
cons: harder to implement
-
-
Top bar (currently implemented)
-
pros: easier to implement
-
cons: less visually intuitive for users compared to side bar
-
3.6.4. Using external library
Originally we were using JFoenix, however due to a bug which causes the alignment of our pages to the tabs to be visually off, we decided to implement a regular tab.
-
Library used: JFoenix
-
Tutorial inspiration: Vertical Tabs
Icons on the Tabs
We have added the icon images for the tabs, but implementation is still a work in progress.
3.7. Day and Night Mode Feature
3.7.1. Current Implementation
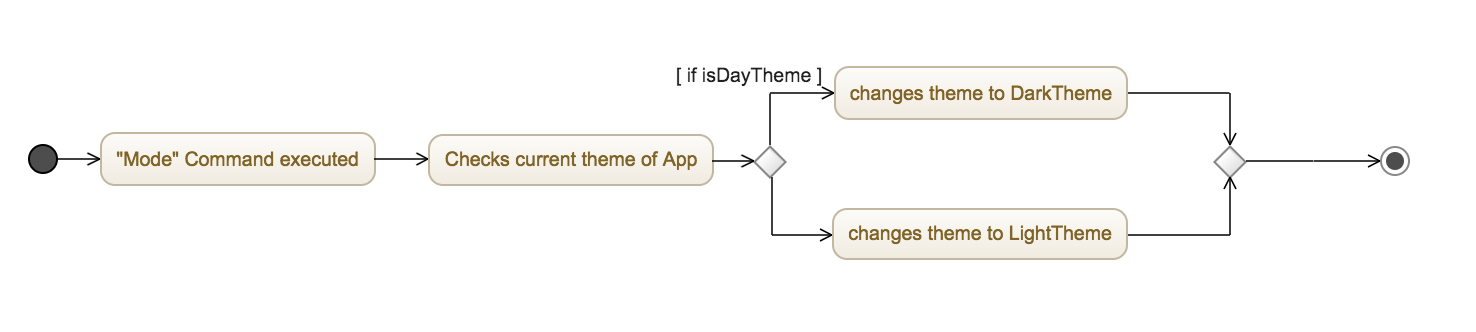
Mode allows you to toggle between day and night mode anywhere in the app and it can be accessed as a command in any AppState of 3VIA.
3.7.2. Handling event
Event is handled in the MainWindow.java.
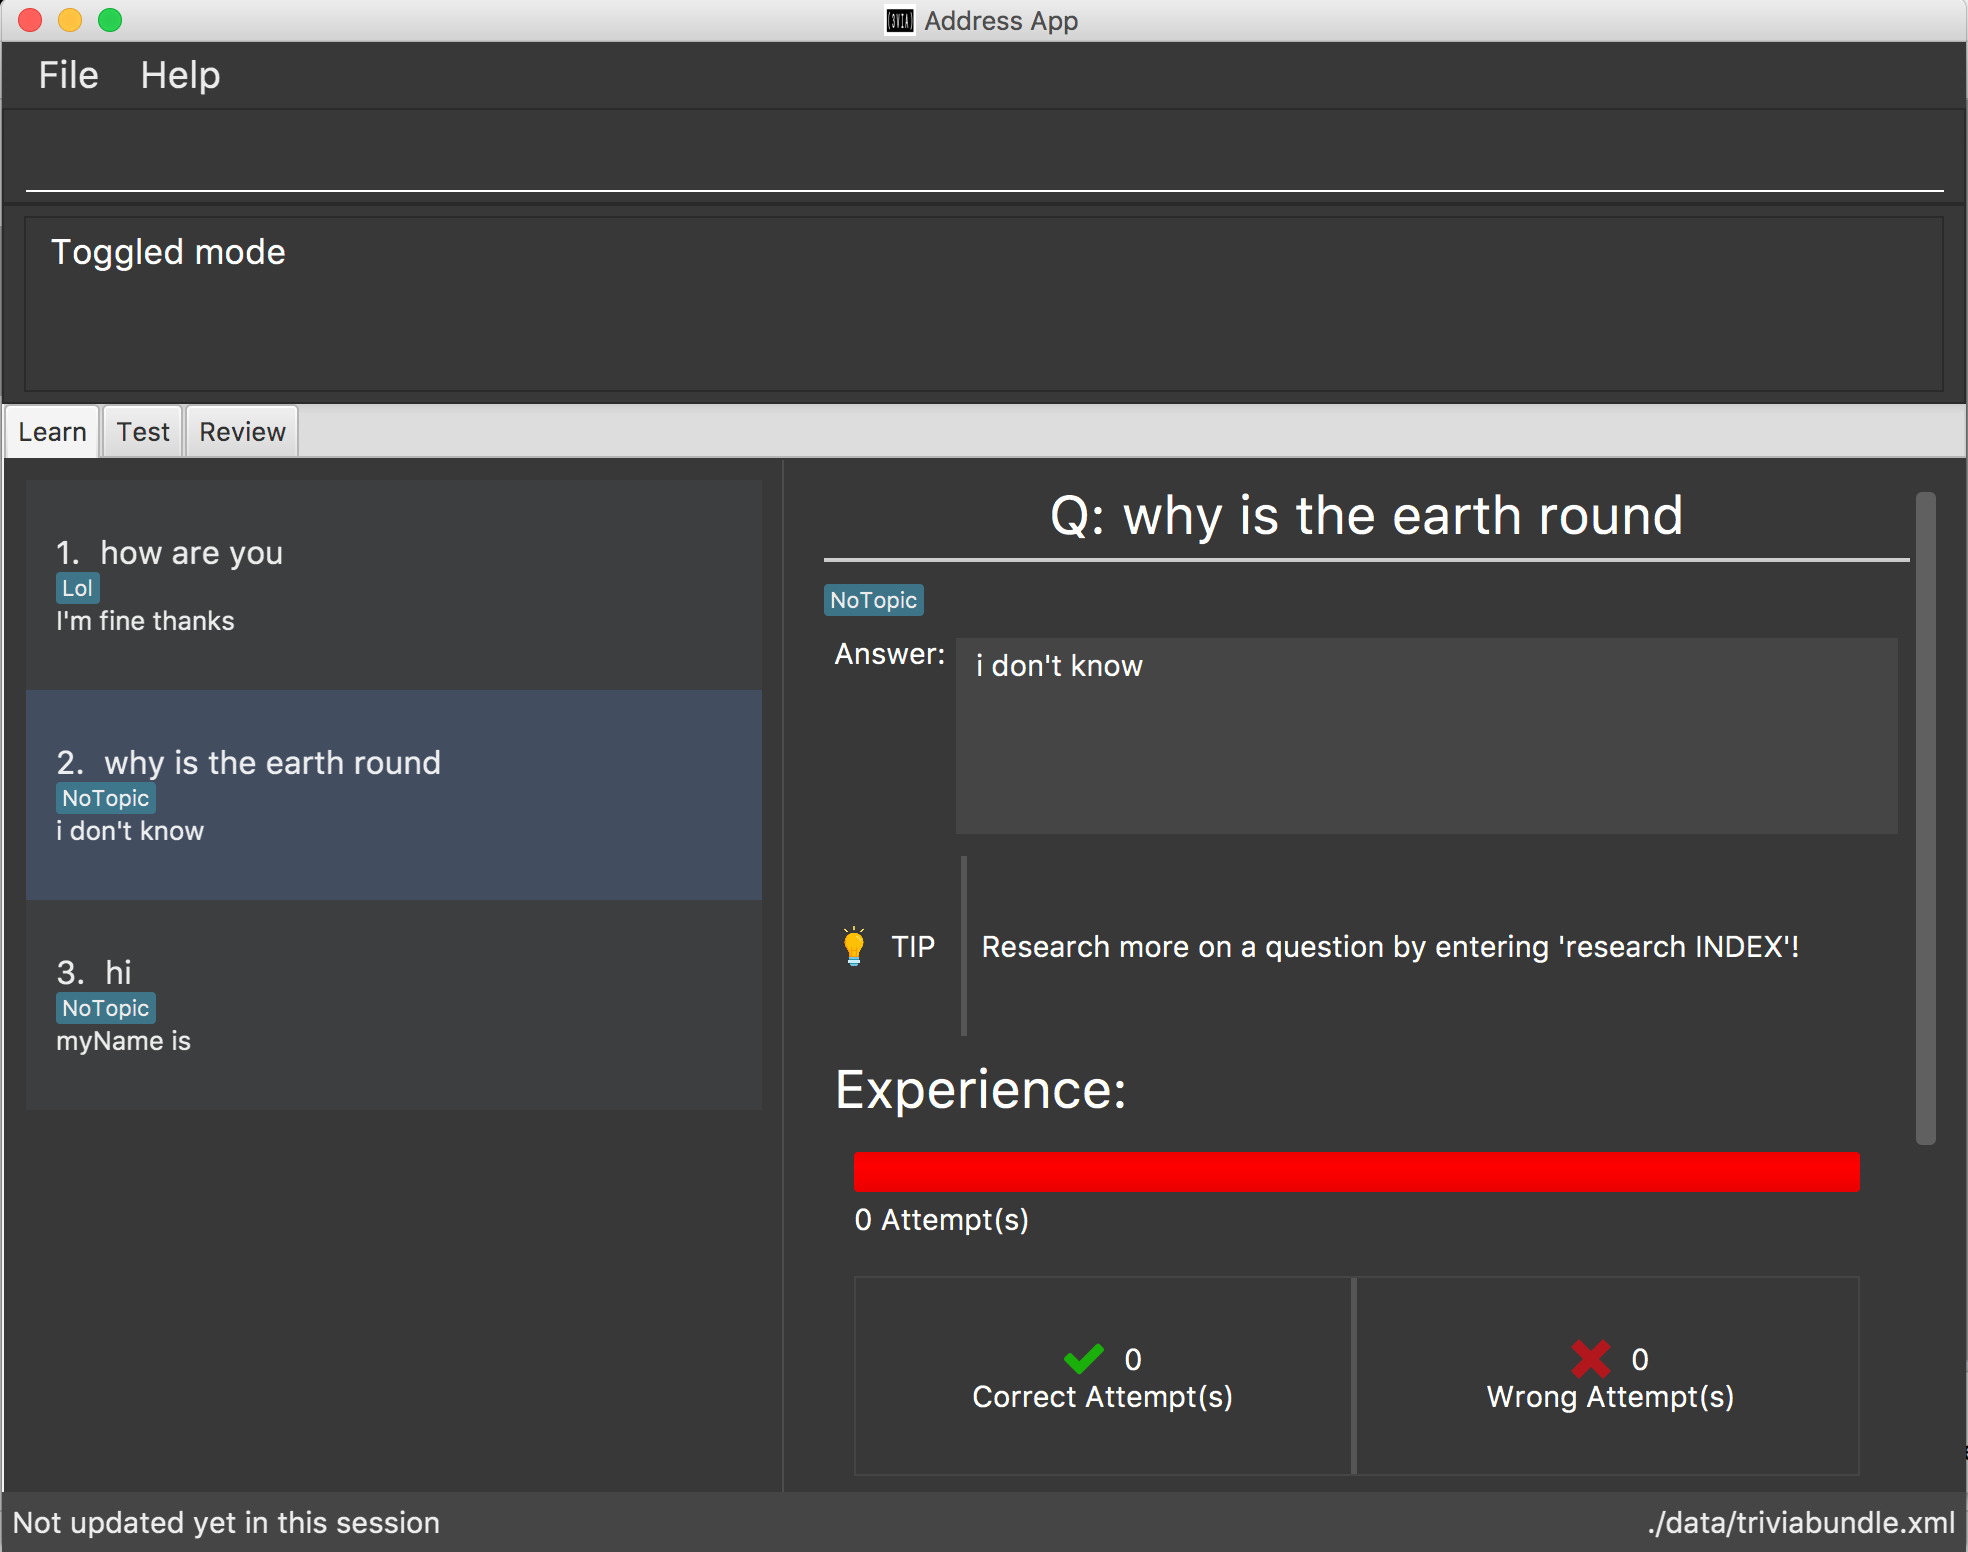
3.7.3. GUI Handling
The default of the application is a "Day Theme" stylesheet, meaning a generally white background
with dark text. The command will swap the current theme set to a "Dark Theme" stylesheet.
Each time the the mode command is called, the boolean in MainDisplay.java acts as a toggle between the 2 themes.
3.8. [Proposed] Delete Multiple Coming in v2.0
3.8.1. Current Implementation
The delete mechanism is facilitated by TriviaBundleParser, DeleteCommandParser, ParserUtil, DeleteCommand and Index.
Currently, DeleteCommandParser invokes ParserUtil#parseIndex() which parses a oneBasedIndex input into an Index.
The DeleteCommand executes the deletion of a card using the zeroBasedIndex as specified in Index.
3.8.2. Proposed Enhancement
To delete a range of cards from 1 to 5, delete 1-5 will be executed.
The proposed deletion of multiple cards will utilise the following operations:
-
ParserUtil#parseIndex()— takes in a one based index. -
ParserUtil#parseMultipleIndex()— takes in a range of one based indexes in a specified format.
Both of the above methods will return a set of Index.
Given below is an example implementation of how delete 1-5 will behave at each step.
Step 1. DeleteCommandParser will determine if the given input deletes a single card or multiple cards.
This can be done by determining if the input contains a -.
Step 2. In this example, ParserUtil#parseMultipleIndex() will execute and return a set of Index.
Step 3. The set of Index is used to initialise DeleteCommand.
Step 4. When DeleteCommand#execute() is invoked. A zero based index is obtained from each Index in the set.
Each zero based index is then used to delete the cards, similar to the current implementation of delete.
3.8.3. Design Consideration
Aspect: Separate or single delete command
-
Alternative 1 (current choice): Single delete command.
-
Pro: Reduces the number of commands for the user to remember.
-
Con: Users may be unaware of this functionality being available as the name of the command does not describe deleting multiple cards.
-
-
Alternative 2: Separate delete command for deleting multiple cards.
-
Pro: The command will describe the action of deleting multiple cards clearly (i.e.
deleteMultiple 1-5). -
Con: There will be more commands for the user to remember.
-
3.9. Logging
We are using java.util.logging package for logging. The LogsCenter class is used to manage the logging levels and logging destinations.
-
The logging level can be controlled using the
logLevelsetting in the configuration file (See Section 3.10, “Configuration”) -
The
Loggerfor a class can be obtained usingLogsCenter.getLogger(Class)which will log messages according to the specified logging level -
Currently log messages are output through:
Consoleand to a.logfile.
Logging Levels
-
SEVERE: Critical problem detected which may possibly cause the termination of the application -
WARNING: Can continue, but with caution -
INFO: Information showing the noteworthy actions by the App -
FINE: Details that is not usually noteworthy but may be useful in debugging e.g. print the actual list instead of just its size
3.10. Configuration
Certain properties of the application can be controlled (e.g App name, logging level) through the configuration file (default: config.json).
4. Documentation
We use asciidoc for writing documentation.
| We chose asciidoc over Markdown because asciidoc, although a bit more complex than Markdown, provides more flexibility in formatting. |
4.1. Editing Documentation
See UsingGradle.adoc to learn how to render .adoc files locally to preview the end result of your edits.
Alternatively, you can download the AsciiDoc plugin for IntelliJ, which allows you to preview the changes you have made to your .adoc files in real-time.
4.2. Publishing Documentation
See UsingTravis.adoc to learn how to deploy GitHub Pages using Travis.
4.3. Converting Documentation to PDF format
We use Google Chrome for converting documentation to PDF format, as Chrome’s PDF engine preserves hyperlinks used in webpages.
Here are the steps to convert the project documentation files to PDF format.
-
Follow the instructions in UsingGradle.adoc to convert the AsciiDoc files in the
docs/directory to HTML format. -
Go to your generated HTML files in the
build/docsfolder, right click on them and selectOpen with→Google Chrome. -
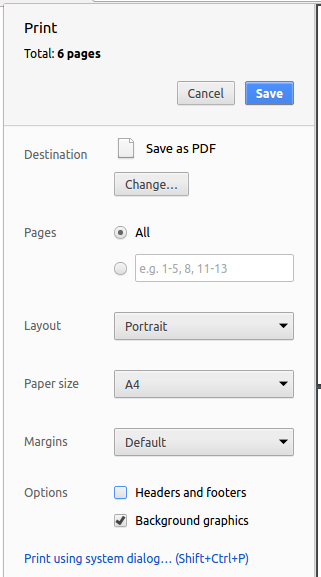
Within Chrome, click on the
Printoption in Chrome’s menu. -
Set the destination to
Save as PDF, then clickSaveto save a copy of the file in PDF format. For best results, use the settings indicated in the screenshot below.
4.4. Site-wide Documentation Settings
The build.gradle file specifies some project-specific asciidoc attributes which affects how all documentation files within this project are rendered.
Attributes left unset in the build.gradle file will use their default value, if any.
|
| Attribute name | Description | Default value |
|---|---|---|
|
The name of the website. If set, the name will be displayed near the top of the page. |
not set |
|
URL to the site’s repository on GitHub. Setting this will add a "View on GitHub" link in the navigation bar. |
not set |
|
Define this attribute if the project is an official SE-EDU project. This will render the SE-EDU navigation bar at the top of the page, and add some SE-EDU-specific navigation items. |
not set |
4.5. Per-file Documentation Settings
Each .adoc file may also specify some file-specific asciidoc attributes which affects how the file is rendered.
Asciidoctor’s built-in attributes may be specified and used as well.
Attributes left unset in .adoc files will use their default value, if any.
|
| Attribute name | Description | Default value |
|---|---|---|
|
Site section that the document belongs to.
This will cause the associated item in the navigation bar to be highlighted.
One of: * Official SE-EDU projects only |
not set |
|
Set this attribute to remove the site navigation bar. |
not set |
4.6. Site Template
The files in docs/stylesheets are the CSS stylesheets of the site.
You can modify them to change some properties of the site’s design.
The files in docs/templates controls the rendering of .adoc files into HTML5.
These template files are written in a mixture of Ruby and Slim.
|
Modifying the template files in |
5. Testing
5.1. Running Tests
There are three ways to run tests.
| The most reliable way to run tests is the 3rd one. The first two methods might fail some GUI tests due to platform/resolution-specific idiosyncrasies. |
Method 1: Using IntelliJ JUnit test runner
-
To run all tests, right-click on the
src/test/javafolder and chooseRun 'All Tests' -
To run a subset of tests, you can right-click on a test package, test class, or a test and choose
Run 'ABC'
Method 2: Using Gradle
-
Open a console and run the command
gradlew clean allTests(Mac/Linux:./gradlew clean allTests)
| See UsingGradle.adoc for more info on how to run tests using Gradle. |
Method 3: Using Gradle (headless)
Thanks to the TestFX library we use, our GUI tests can be run in the headless mode. In the headless mode, GUI tests do not show up on the screen. That means the developer can do other things on the Computer while the tests are running.
To run tests in headless mode, open a console and run the command gradlew clean headless allTests (Mac/Linux: ./gradlew clean headless allTests)
5.2. Types of tests
We have two types of tests:
-
GUI Tests - These are tests involving the GUI. They include,
-
System Tests that test the entire App by simulating user actions on the GUI. These are in the
systemtestspackage. -
Unit tests that test the individual components. These are in
seedu.address.uipackage.
-
-
Non-GUI Tests - These are tests not involving the GUI. They include,
-
Unit tests targeting the lowest level methods/classes.
e.g.seedu.address.commons.StringUtilTest -
Integration tests that are checking the integration of multiple code units (those code units are assumed to be working).
e.g.seedu.address.storage.StorageManagerTest -
Hybrids of unit and integration tests. These test are checking multiple code units as well as how the are connected together.
e.g.seedu.address.logic.LogicManagerTest
-
5.3. Troubleshooting Testing
Problem: HelpWindowTest fails with a NullPointerException.
-
Reason: One of its dependencies,
HelpWindow.htmlinsrc/main/resources/docsis missing. -
Solution: Execute Gradle task
processResources.
6. Dev Ops
6.1. Build Automation
See UsingGradle.adoc to learn how to use Gradle for build automation.
6.2. Continuous Integration
We use Travis CI and AppVeyor to perform Continuous Integration on our projects. See UsingTravis.adoc and UsingAppVeyor.adoc for more details.
6.3. Coverage Reporting
We use Coveralls to track the code coverage of our projects. See UsingCoveralls.adoc for more details.
6.4. Documentation Previews
When a pull request has changes to asciidoc files, you can use Netlify to see a preview of how the HTML version of those asciidoc files will look like when the pull request is merged. See UsingNetlify.adoc for more details.
6.5. Making a Release
Here are the steps to create a new release.
-
Update the version number in
MainApp.java. -
Generate a JAR file using Gradle.
-
Tag the repo with the version number. e.g.
v0.1 -
Create a new release using GitHub and upload the JAR file you created.
6.6. Managing Dependencies
A project often depends on third-party libraries. For example, Address Book depends on the Jackson library for XML parsing. Managing these dependencies can be automated using Gradle. For example, Gradle can download the dependencies automatically, which is better than these alternatives.
a. Include those libraries in the repo (this bloats the repo size)
b. Require developers to download those libraries manually (this creates extra work for developers)
Appendix A: Product Scope
Target user profile:
-
For students/learners who wants to reinforce their knowledge
-
can type fast
Value proposition: help students memorise and test their knowledge quickly
Appendix B: User Stories
Priorities: High (must have) - * * *, Medium (nice to have) - * *, Low (unlikely to have) - *
| Priority | As a … | I want to … | So that I can… |
|---|---|---|---|
|
curious learner |
be able to test my knowledge |
be sure that I have memorised the content |
|
hardworking learner |
have different testing mechanisms |
reinforce my knowledge and clear any misconceptions. |
|
user |
list all the contents in a deck of cards |
review all the contents in one glance |
|
user |
to search for questions |
look-up answers to questions that I can’t remember |
|
user |
mass import multiple cards at the same time from a single file |
input large amount of data at once |
|
efficient user |
have a timer on the time to answer each question |
improve the ability to recall information quickly |
|
curious user |
research more on the question |
learn at a greater depth |
|
consistent user |
revise on the contents which I’m not familiar with more often |
memorise those content permanently |
|
multilingual user |
input text in different languages |
learn another language |
|
competitive user |
have a multi player function |
challenge my friends’ knowledge |
Appendix C: Use Cases
(For all use cases below, the System is the 3VIA and the Actor is the user, unless specified otherwise)
Use case 1: Find more info on a topic
MSS
-
User: Search for a certain question using keywords.
-
System: Shows a list of questions that meets the search criteria.
-
User: Select a question.
-
System: Displays the question and answer.
-
User: Request more info regarding the question.
-
System: Display more info.
Use case ends.
Extensions
-
1a. No matches.
-
1a1. System: Indicates no question.
Use case ends.
-
-
2a. User wants to see more question
-
2a1. User request for matching questions again.
Use case resumes at step 2.
-
Use case 2: Add Card
MSS
-
User: Adds question, answer and topic(s).
-
System: Displays the question and answer added.
Use case ends.
Extensions
-
1a. Incorrect format.
-
1a1. System: Indicates format entered is incorrect.
Use case ends.
-
Use case 3: Open-Ended Test
MSS
-
User: User start open-ended test.
-
System: Displays list of questions with topic.
-
User: Confirms questions to be tested.
-
System: Displays question and starts the timer (if specified) for the question.
-
User: Key in the user’s answer.
-
System: Display the correct answer and wait for the user to determine the correctness of the question.
-
User: User determine the correctness of the question.
-
Repeat step 4 until all cards have been viewed and answered.
Use case ends.
Extensions
-
2a. Topic not found
-
2a1. System: Indicates topic not found.
Use case ends.
-
-
4a. Time limit exceeded and user did not answer the question
-
4a1. System: Continue to next question at step 4.
Use case resumes at step 4 on the next question.
-
Use case 4: MatchTest
MSS
-
User: Start
MatchTest. -
System: Shows a list of question and answer.
-
User: Select the matching question and answer.
-
Repeat step 3 until user matched all the questions and answers correctly.
-
System: Record down and show the results of the test.
Use case ends.
Extensions
-
3a. Question and answer matched wrongly.
-
3a1. System: Indicates that question and answer matched are wrongly.
Use case resumes at step 3.
-
-
4a. User exit from the test without completing it.
-
4a1. System: Step 5 will not be carried out.
Use case ends.
-
Use case 5: Import
MSS
-
User: Input import command.
-
System: Parses import file, displays the cards and the number of cards imported.
-
User: Reviews cards imported.
Use case ends.
Extensions
-
2a. Invalid file.
-
2a1. System: Display invalid file path.
Use case ends.
-
-
2a. Wrong text format.
-
2a1. System: Displays error, import failure.
Use case ends.
-
Appendix D: Non Functional Requirements
-
Should work on any mainstream OS as long as it has Java
9or higher installed. -
The maximum number of question that the app can have should not be capped.
-
The application should be intuitive and easy to use.
-
The application should still work, without internet access.
Appendix F: Instructions for Manual Testing
Given below are instructions to test the app manually.
| These instructions only provide a starting point for testers to work on; testers are expected to do more exploratory testing. |
F.1. Launch and Shutdown
-
Initial launch
-
Download the jar file and copy into an empty folder
-
Double-click the jar file
Expected: Shows the GUI with a set of sample contacts. The window size may not be optimum.
-
-
Saving window preferences
-
Resize the window to an optimum size. Move the window to a different location. Close the window.
-
Re-launch the app by double-clicking the jar file.
Expected: The most recent window size and location is retained.
-
F.2. Deleting a card
-
Deleting a card while all cards are listed
-
Prerequisites: List all cards using the
learncommand. Multiple cards in the list. -
Test case:
delete 1
Expected: First card is deleted from the list. Details of the deleted card shown in the status message. Timestamp in the status bar is updated. -
Test case:
delete 0
Expected: No card is deleted. Error details shown in the status message. Status bar remains the same. -
Other incorrect delete commands to try:
delete,delete x(where x is larger than the list size)
Expected: Similar to previous.
-
F.3. MatchTest
-
Starting a
MatchTestwith a specified topic.-
Test case:
testM Physics
Expected: Suppose that there are more than 1 cards in the topic,MatchTestwould start normally.` Test case: 'testM GeneralKnowledge'would not start. Error details would be in the status message.
Expected: Suppose that there are 1 or less cards in the topic, `MatchTest -
Prerequisites: There are more than 1 cards in the topic of Physics.
Test case:testM Physics
Expected:MatchTestwould start normally. -
Prerequisites: Suppose that there are 1 or less cards in the topic of GeneralKnowledge.
Test case:testM GeneralKnowledge
Expected:MatchTestwould not start. Error details would be in the status message.
-
-
Matching question and answer
-
Prerequisites: In a
MatchTest, and that index 3 and 4 are valid indexes that exist in the question and answer list respectively.
Test case:3 4
Expected: If3 4is a correct match, you should observe there will be a green flash on question with index 3 and answer with index 4. And the followed by the question and answer being removed. If3 4is a wrong match, you should observe that there will be a red flash on question with index 3 and answer with index 4. -
Prerequisites: In a
MatchTest, and there is an answer with index of 2.
Test case:2
Expected: Will be a repeat of the above test case but with the index of the question at the top of the question list and answer with index of 2. -
Prerequisites: In a
MatchTest.
Test case:wrong
Expected: Error details would be in the status message.
-
-
At result page of
MatchTest
Prerequisites: At the ResultPage ofMatchTest.-
Test case:
exit
Expected: Should observe you are being redirected toTriviaTestMenuPage. -
Test case:
anothercommand
Expected: Error details would be in the status message.
-
F.4. Selecting a card
-
Selecting a card while all cards are listed
Prerequisites: List all cards using thelearncommand. Multiple cards in the list.-
Test case:
select 1
Expected: First card is selected from the list. Details of the card shown in the information panel. -
Test case:
select 0
Expected: No card is selected. Error details shown in the status message. -
Other incorrect select commands to try:
select,select x(where x is larger than the list size)
Expected: Similar to previous.
-
F.5. Researching on a card
-
Researching on a card while all cards are listed
-
Prerequisites: There is internet connection. List all cards using the
researchcommand. Multiple cards in the list.
Test case:research 1
Expected: Shows the online resources of the card’s question in the information panel. -
Prerequisites: There is no internet connection. List all cards using the
researchcommand. Multiple cards in the list.
Test case:research 1
Expected: Shows error details on the information panel.
-
F.6. Importing cards
-
Importing a list of cards
-
Prerequisites: Create an empty text/plain file named
file.txt. Copy it’s absolute/ relative file path. (i.e file.txt) -
Add a few question and answer pairs into
file.txt. The question and answer should be separated by aTABspace. Additionally, each question and answer pair is separated by a new line. Make sure to follow the format as specified in the User Guide. Save the file.Test case:
import file.txt
Expected: Import success. The name of the file and the number of cards imported will be displayed in the results display. -
Add a topic " t/topic" (note the whitespace before "t/") above the question and answer pairs. Save the file.
Test case:
import file.txt
Expected: Import success. The name of the file and the number of cards imported will be displayed in the results display. The cards added should be tagged with the respective topics added. -
Remove all text in the
file.txt. Save the file.Test case:
import file.txt
Expected: Import failure. No card will be imported. Error details shown in the results display.
-